
What is a Modifier?
Modifiers serve as additional ingredients for a lead item, either included by default or as optional add-ons. For example, a burger typically includes lettuce, tomato, red onion, and mayonnaise, which can be adjusted for customer preferences. This feature shows the adaptation of the restaurant to the customer's needs.
Modifiers can be free text or items from the catalog.
-
A group of Item(s) or free text that is available to add to or remove from an item(s)
-
A group of Item(s) or free text that comes with an item(s)
-
If an Item is in a Modifier Group it can have a price associated to it
The 'i' icon next to the modifier indicates the modifier is an item
|
Selection Required |
Selection Optional |
|
|
-
As of 3/1/2025, nested modifiers are possible.
When creating a modifier, there are a few questions you need to ask yourself:
-
Do I want to see this information on the modifier in my reports?
When a modifier is entered as free text, it won't be included in the reports. Each item created in the catalog receives a unique ID, and all the details related to that ID are documented. Since free text doesn't have an ID, we can't provide any details for it
-
Do I want the ability to limit this modifier?
If a modifier is a free text, it cannot be limited or out of stock because it isn't an item
-
Do I want to have an additional price for this modifier?
Some modifiers can be added to an item for an additional price. For example, cheese for salad can be added for an additional 1$. In this case, the cheese modifier must be an item to give it an additional price
Learn how to add an additional price to a modifier here
-
Do I need to route this modifier to a printer different from where the lead item is routed?
Sometimes, a modifier might be sent to a different kitchen station than the lead item. For example, in a salad with grilled chicken, the salad, which is the lead item, goes to the salad kitchen station, while the grilled chicken is sent to the grill kitchen station. In this case, the modifier should be created as an item
-
If the answer to any of the questions above is Yes you should create a modifier item, otherwise you can create modifiers as free text
After you answer the questions above, learn how to add an item or how to add a modifier group
Further reading below.
Modifier Group or Combo Group?
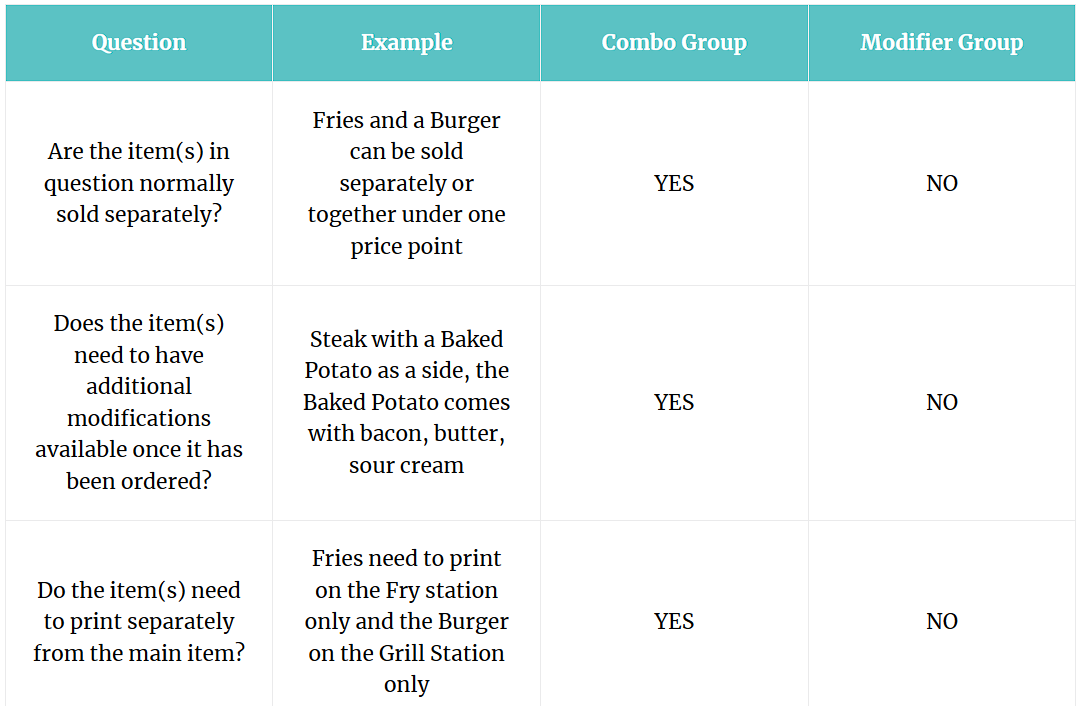
Determine Placings on the Item
-
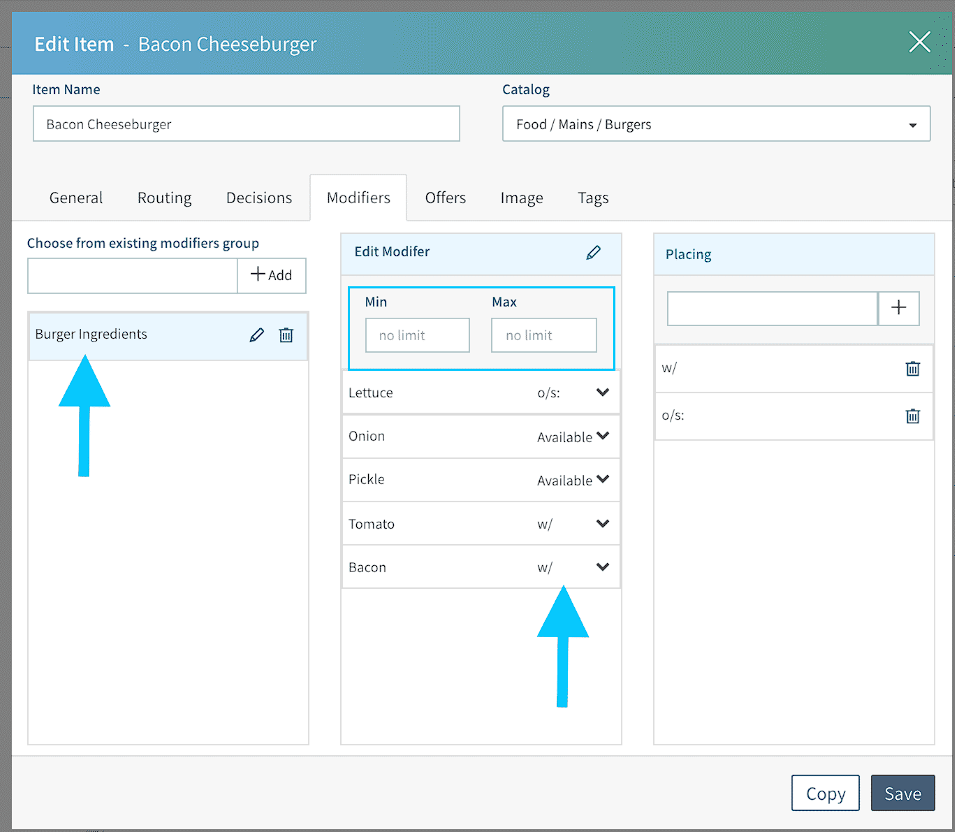
Each Item can have customized placings - the default when creating an Item through Tabit Office is "w/" and "On Side:"
-
Placings can be uploaded during the Menu Item Import process or changed at the Item level
-
Placings are listed in order, the one at the top of the list (usually w/) is referred to as "First Placing"
-
Best practice is to have at least one (1) placing option and no more than four (4) in total
Check out the below Placings
Building a Modifier Group
Adding a Modifier Group
-
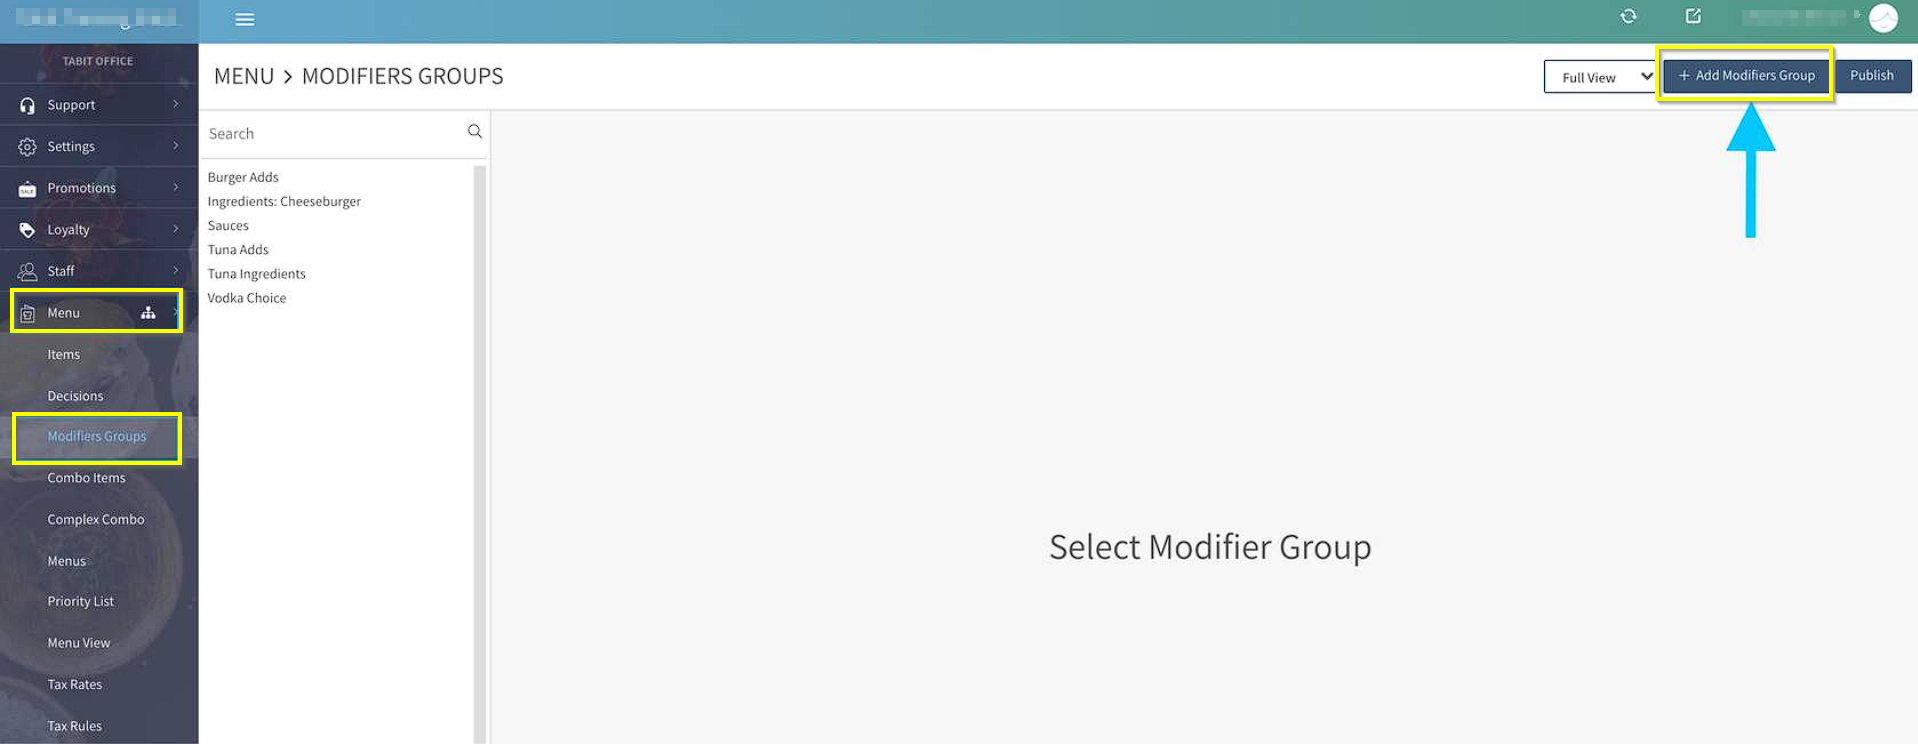
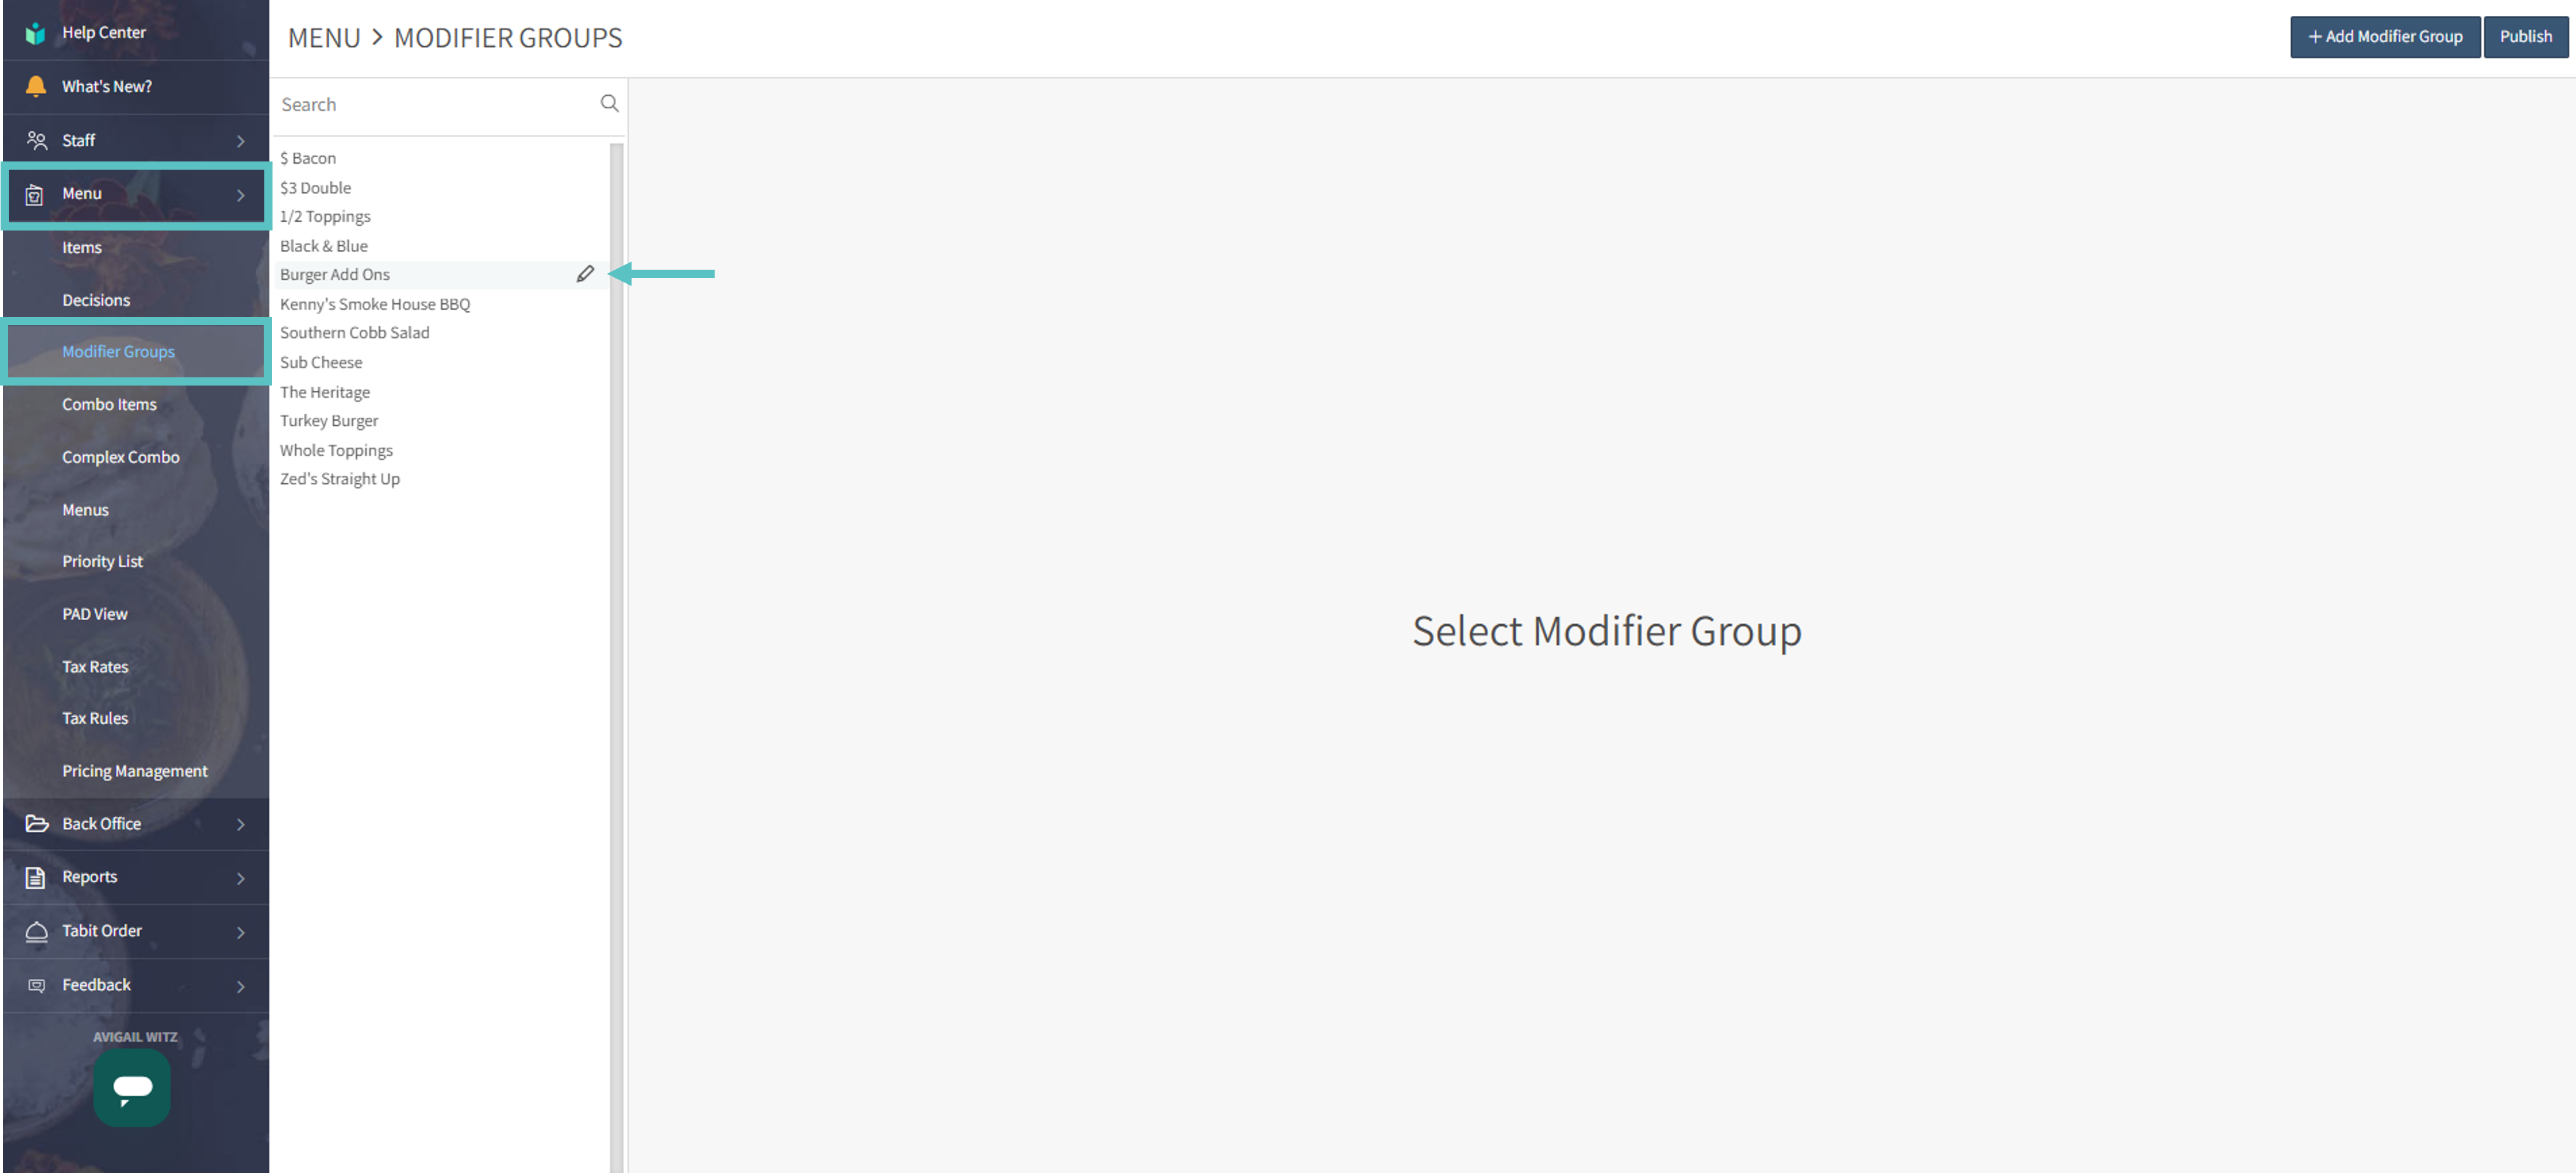
Login to Tabit Office with your Manager credentials, then go to Menu and then Modifiers Groups
-
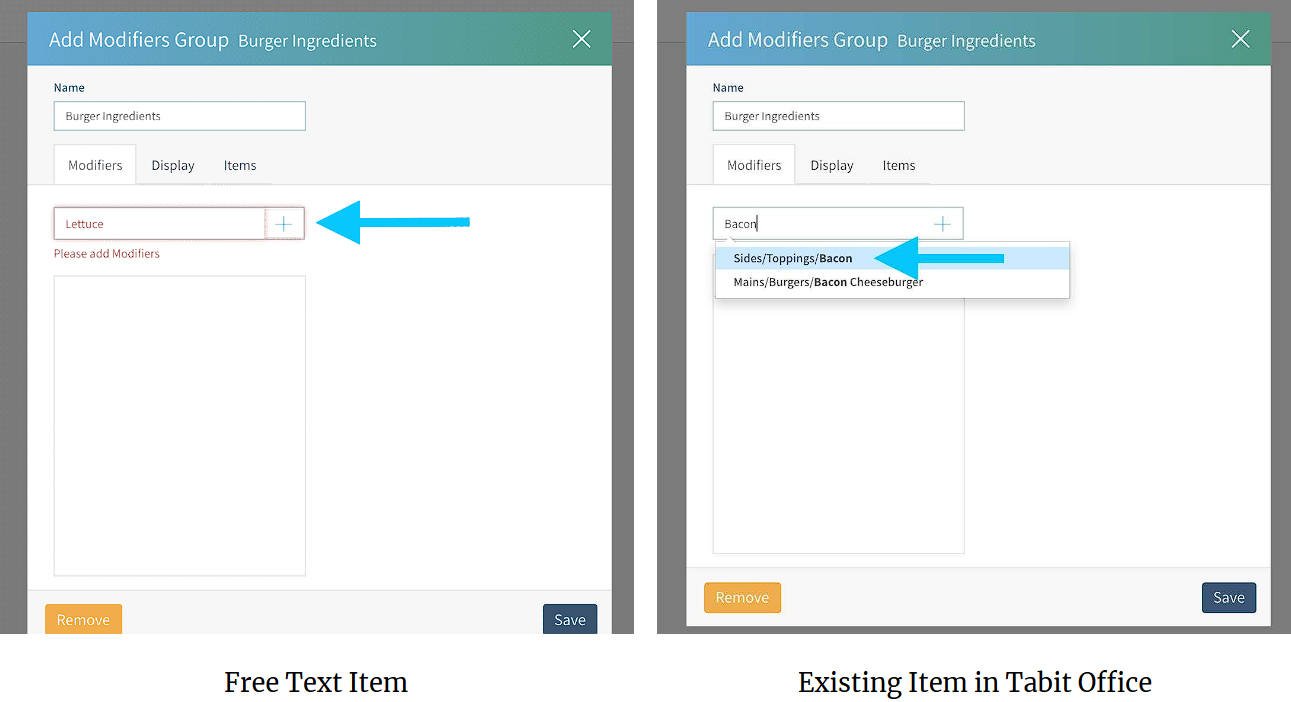
Click on "+ Add Modifiers Group"
-
Name the Modifier Group - the name of the Modifier Group will show on the PAD for the server and on Tabit Order for the end user
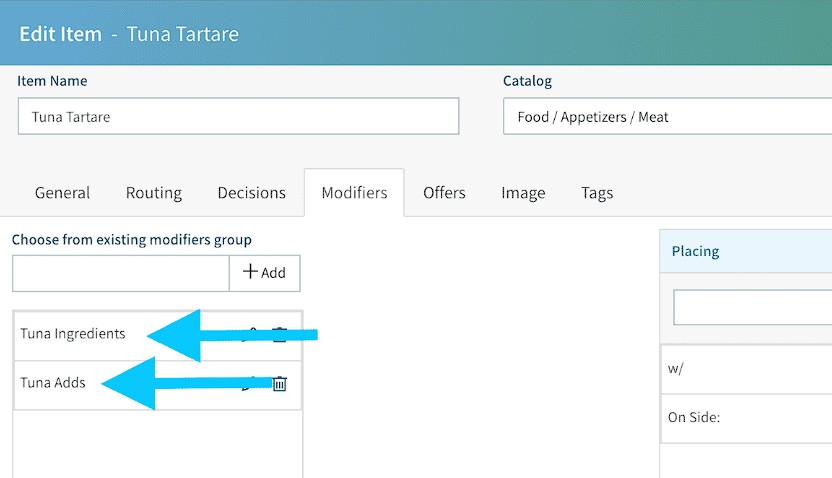
Modifier Group in Tabit Office 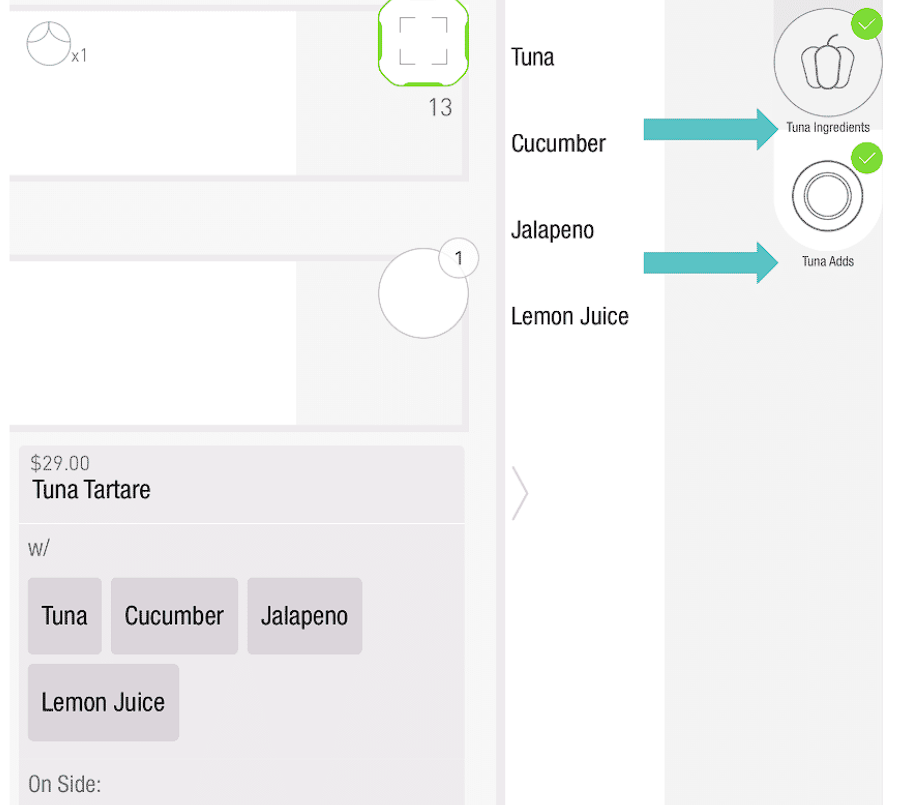
Modifier Group on PAD 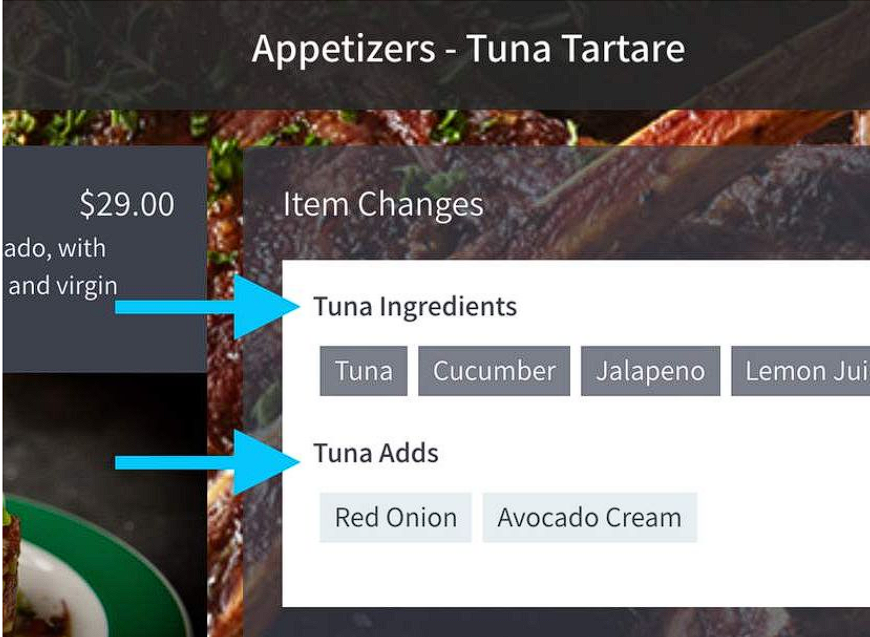
Modifier Group in Tabit Order -
In the text box, enter free text into the field and click on the "+" to add to the group
-
Or select the item as suggested by progressive search and click on the "+" to add to the group
Best practice is to have as many options in Items for the ability to limit stock
-
Continue this process until all items are listed in the Modifier Group
Check Out the Six Points Below of the Modifier Group Breakdown
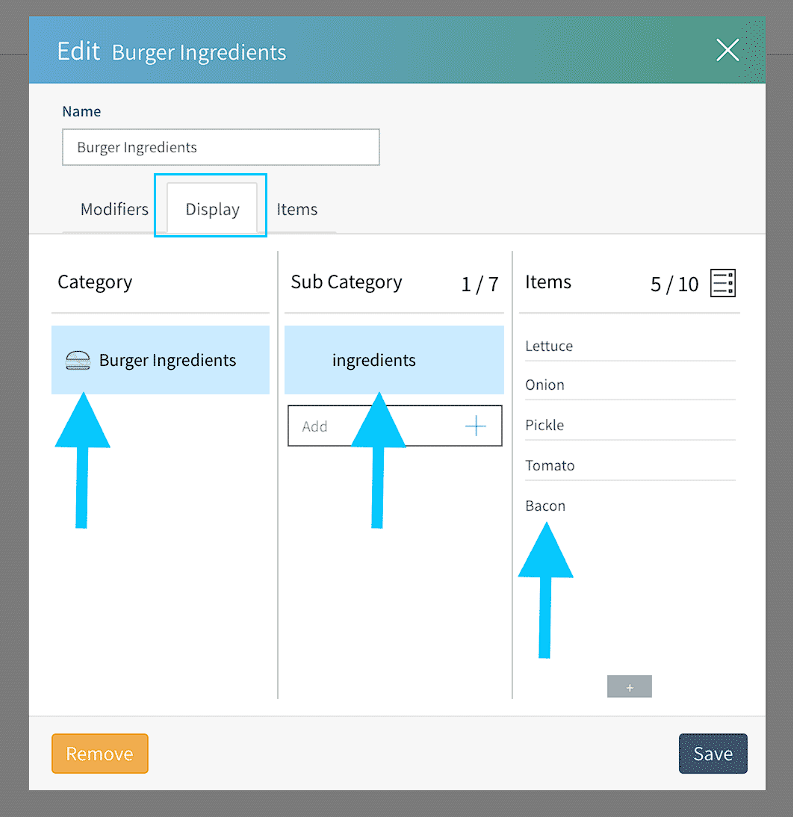
Display Tab
-
Select an icon for the Category and Sub Category if there is more than one
-
Name the Sub Category if more than one
-
Click and drag the items around to put in the desired order for the PAD
-
Each Modifier Group can have up to 7 Sub Categories and 10 Items per Sub Category
Within the Modifier Group, put the highest $ amount or the most popular items at the top of the list
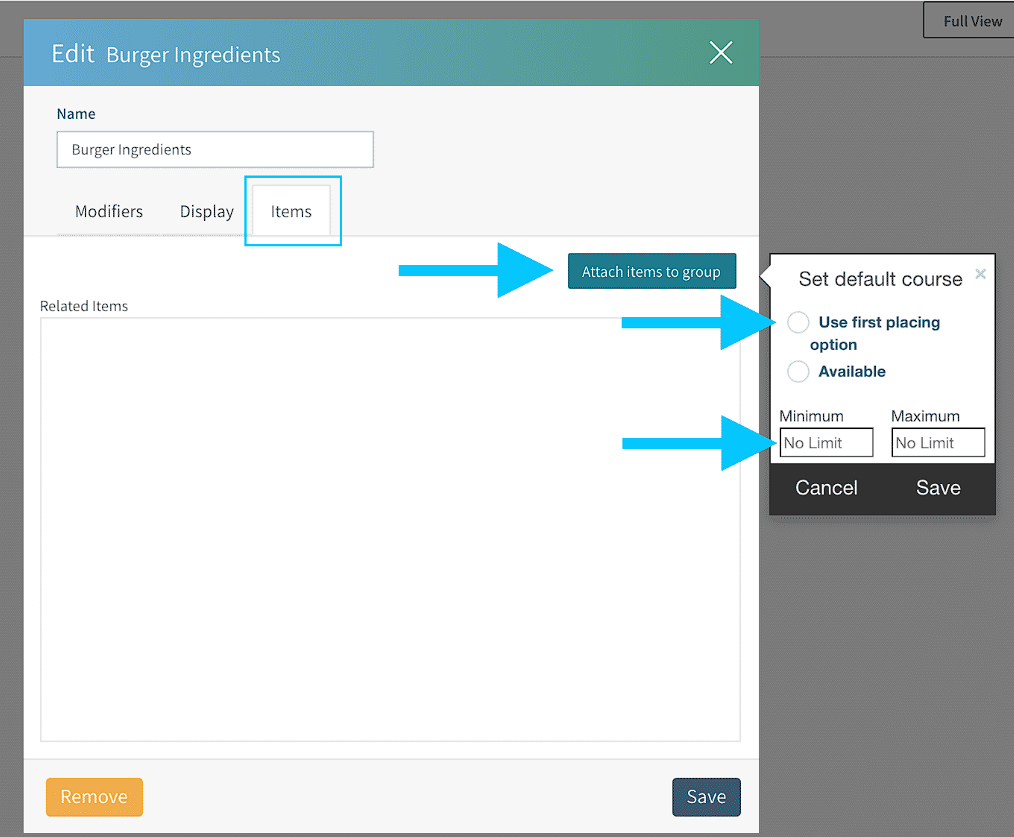
How to Attach an Item(s) to a Modifier Group
-
Under the "Items" tab select "Attach items to group"
-
Choose if the item(s) should all be put under the First Placing Option (default is w/) or are Available to add to an Item *
-
Set any Minimum or Maximum if necessary and select "Save" to select the Item(s) *
[ * ]These settings can be overridden at the item level, best practice is to use as few modifier groups within a category of items as a base group and then make changes per item as needed.
-
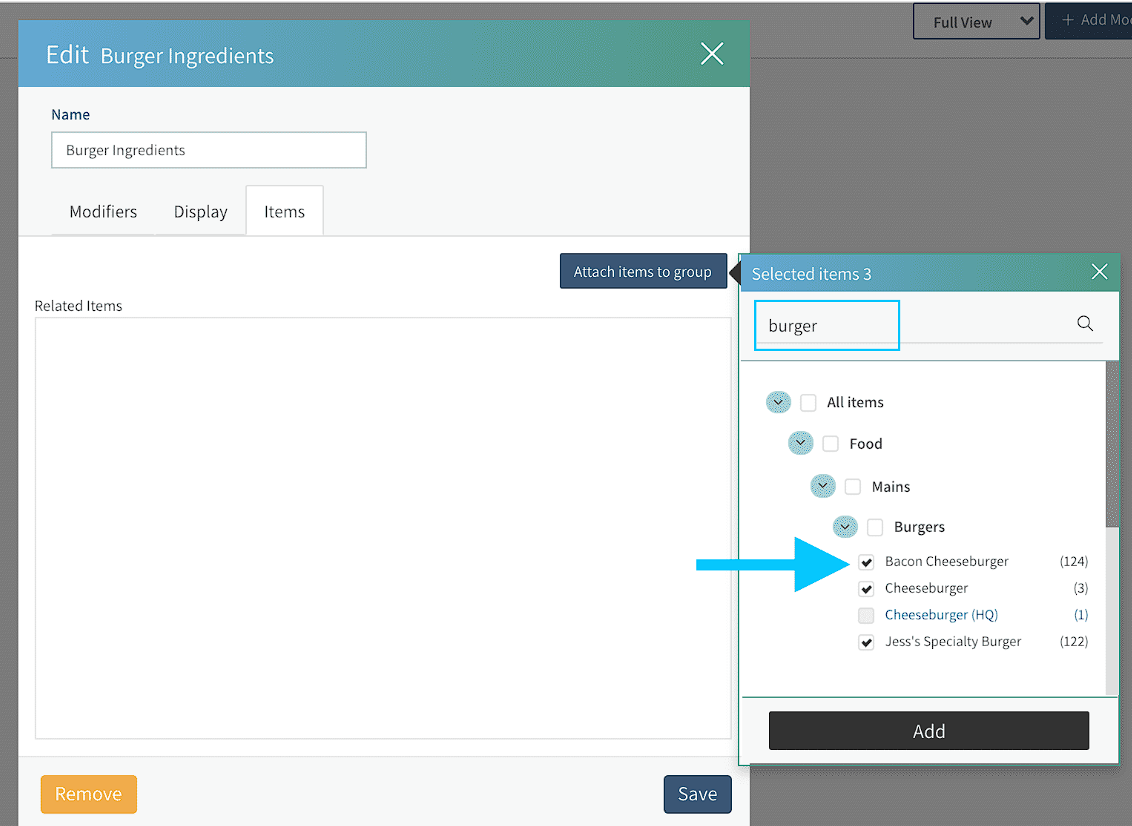
Type in the name of the item(s) to attach the Modifier Group or use the Catalog to drill down into a specific Department
-
Check the box next to the item(s) the group needs to be attached to
-
Click "Add"
-
A list of all added item(s) will appear
-
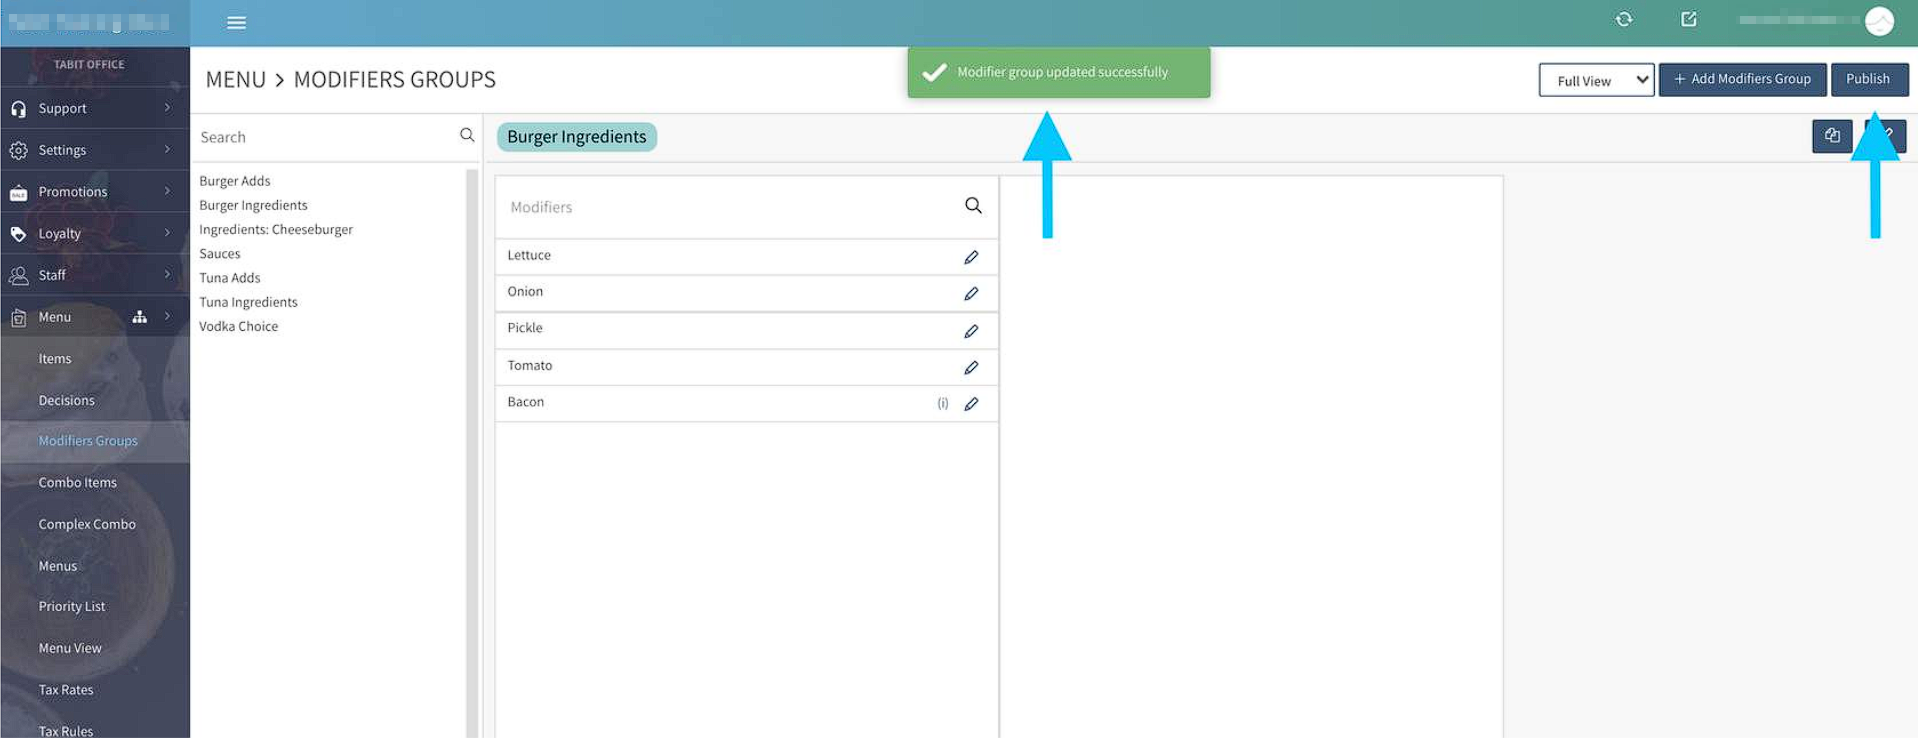
Click "Save" to update
-
This will close the pop up and display a confirmation that the Modifier Group was successfully updated
-
Select "Publish" to update changes and send the information to the Cloud
See How to Attach an Item Below
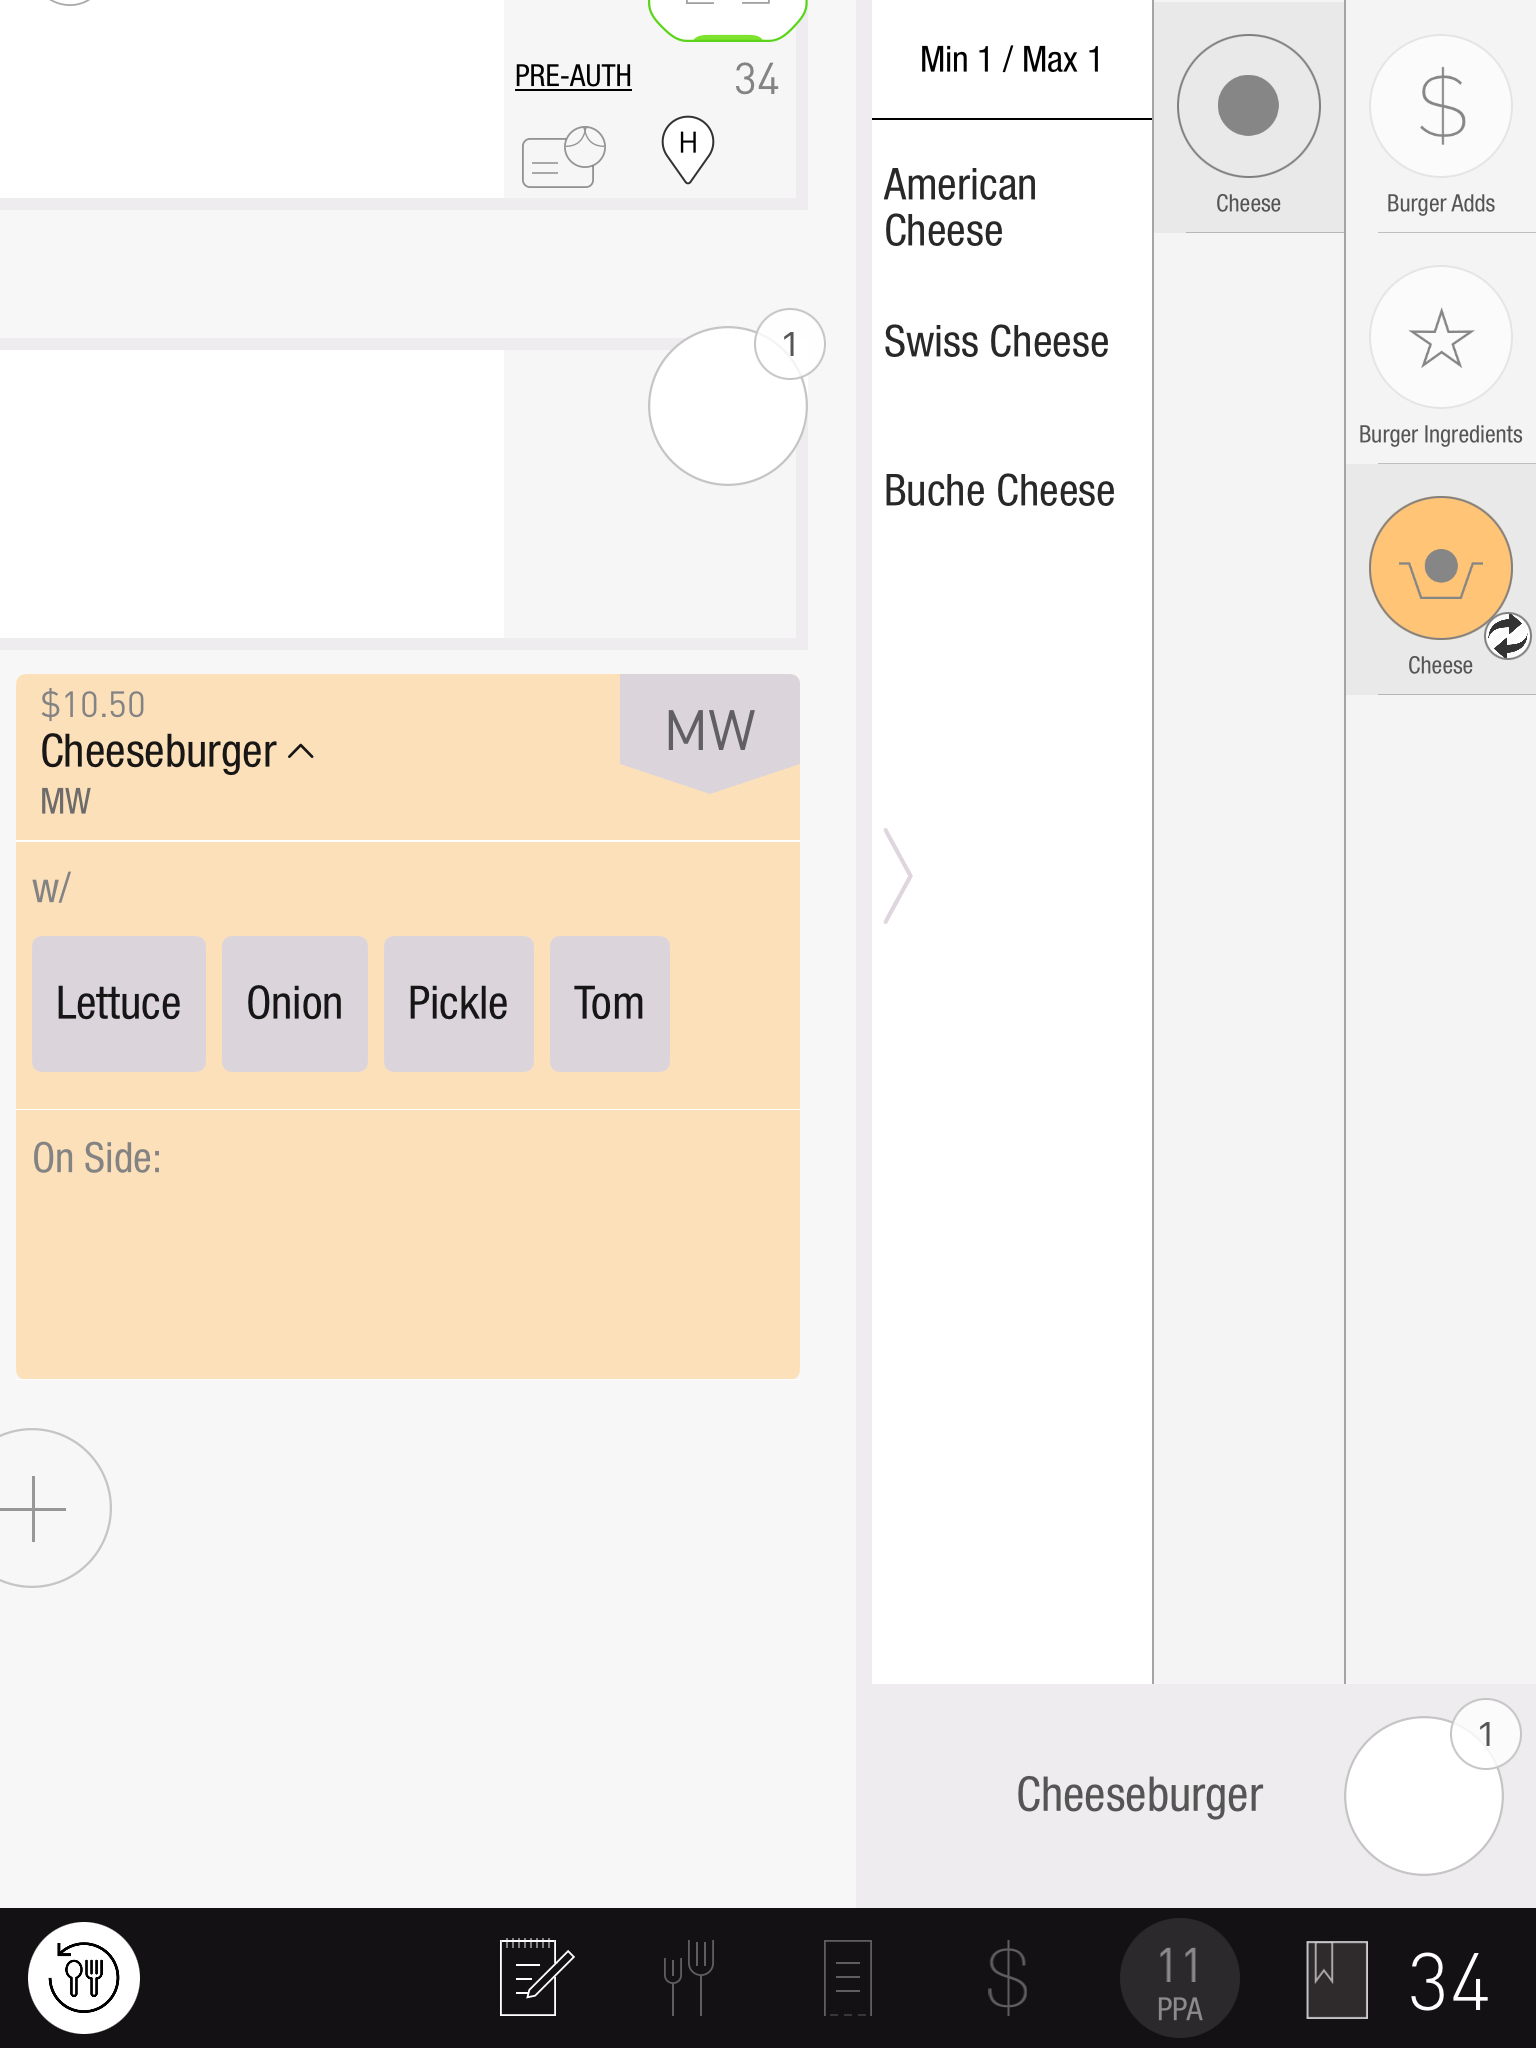
How to Add Price to a Modifier
Some modifiers can be added to an item for an additional price. For example, cheese for salad can be added for an additional 1$. Additional prices can be added only to modifiers that are items.
Follow the steps below to add an additional price to a modifier:
-
In Tabit Office, go to Menu > Modifier Groups and select the Edit Icon to the right of the relevant modifier group.
-
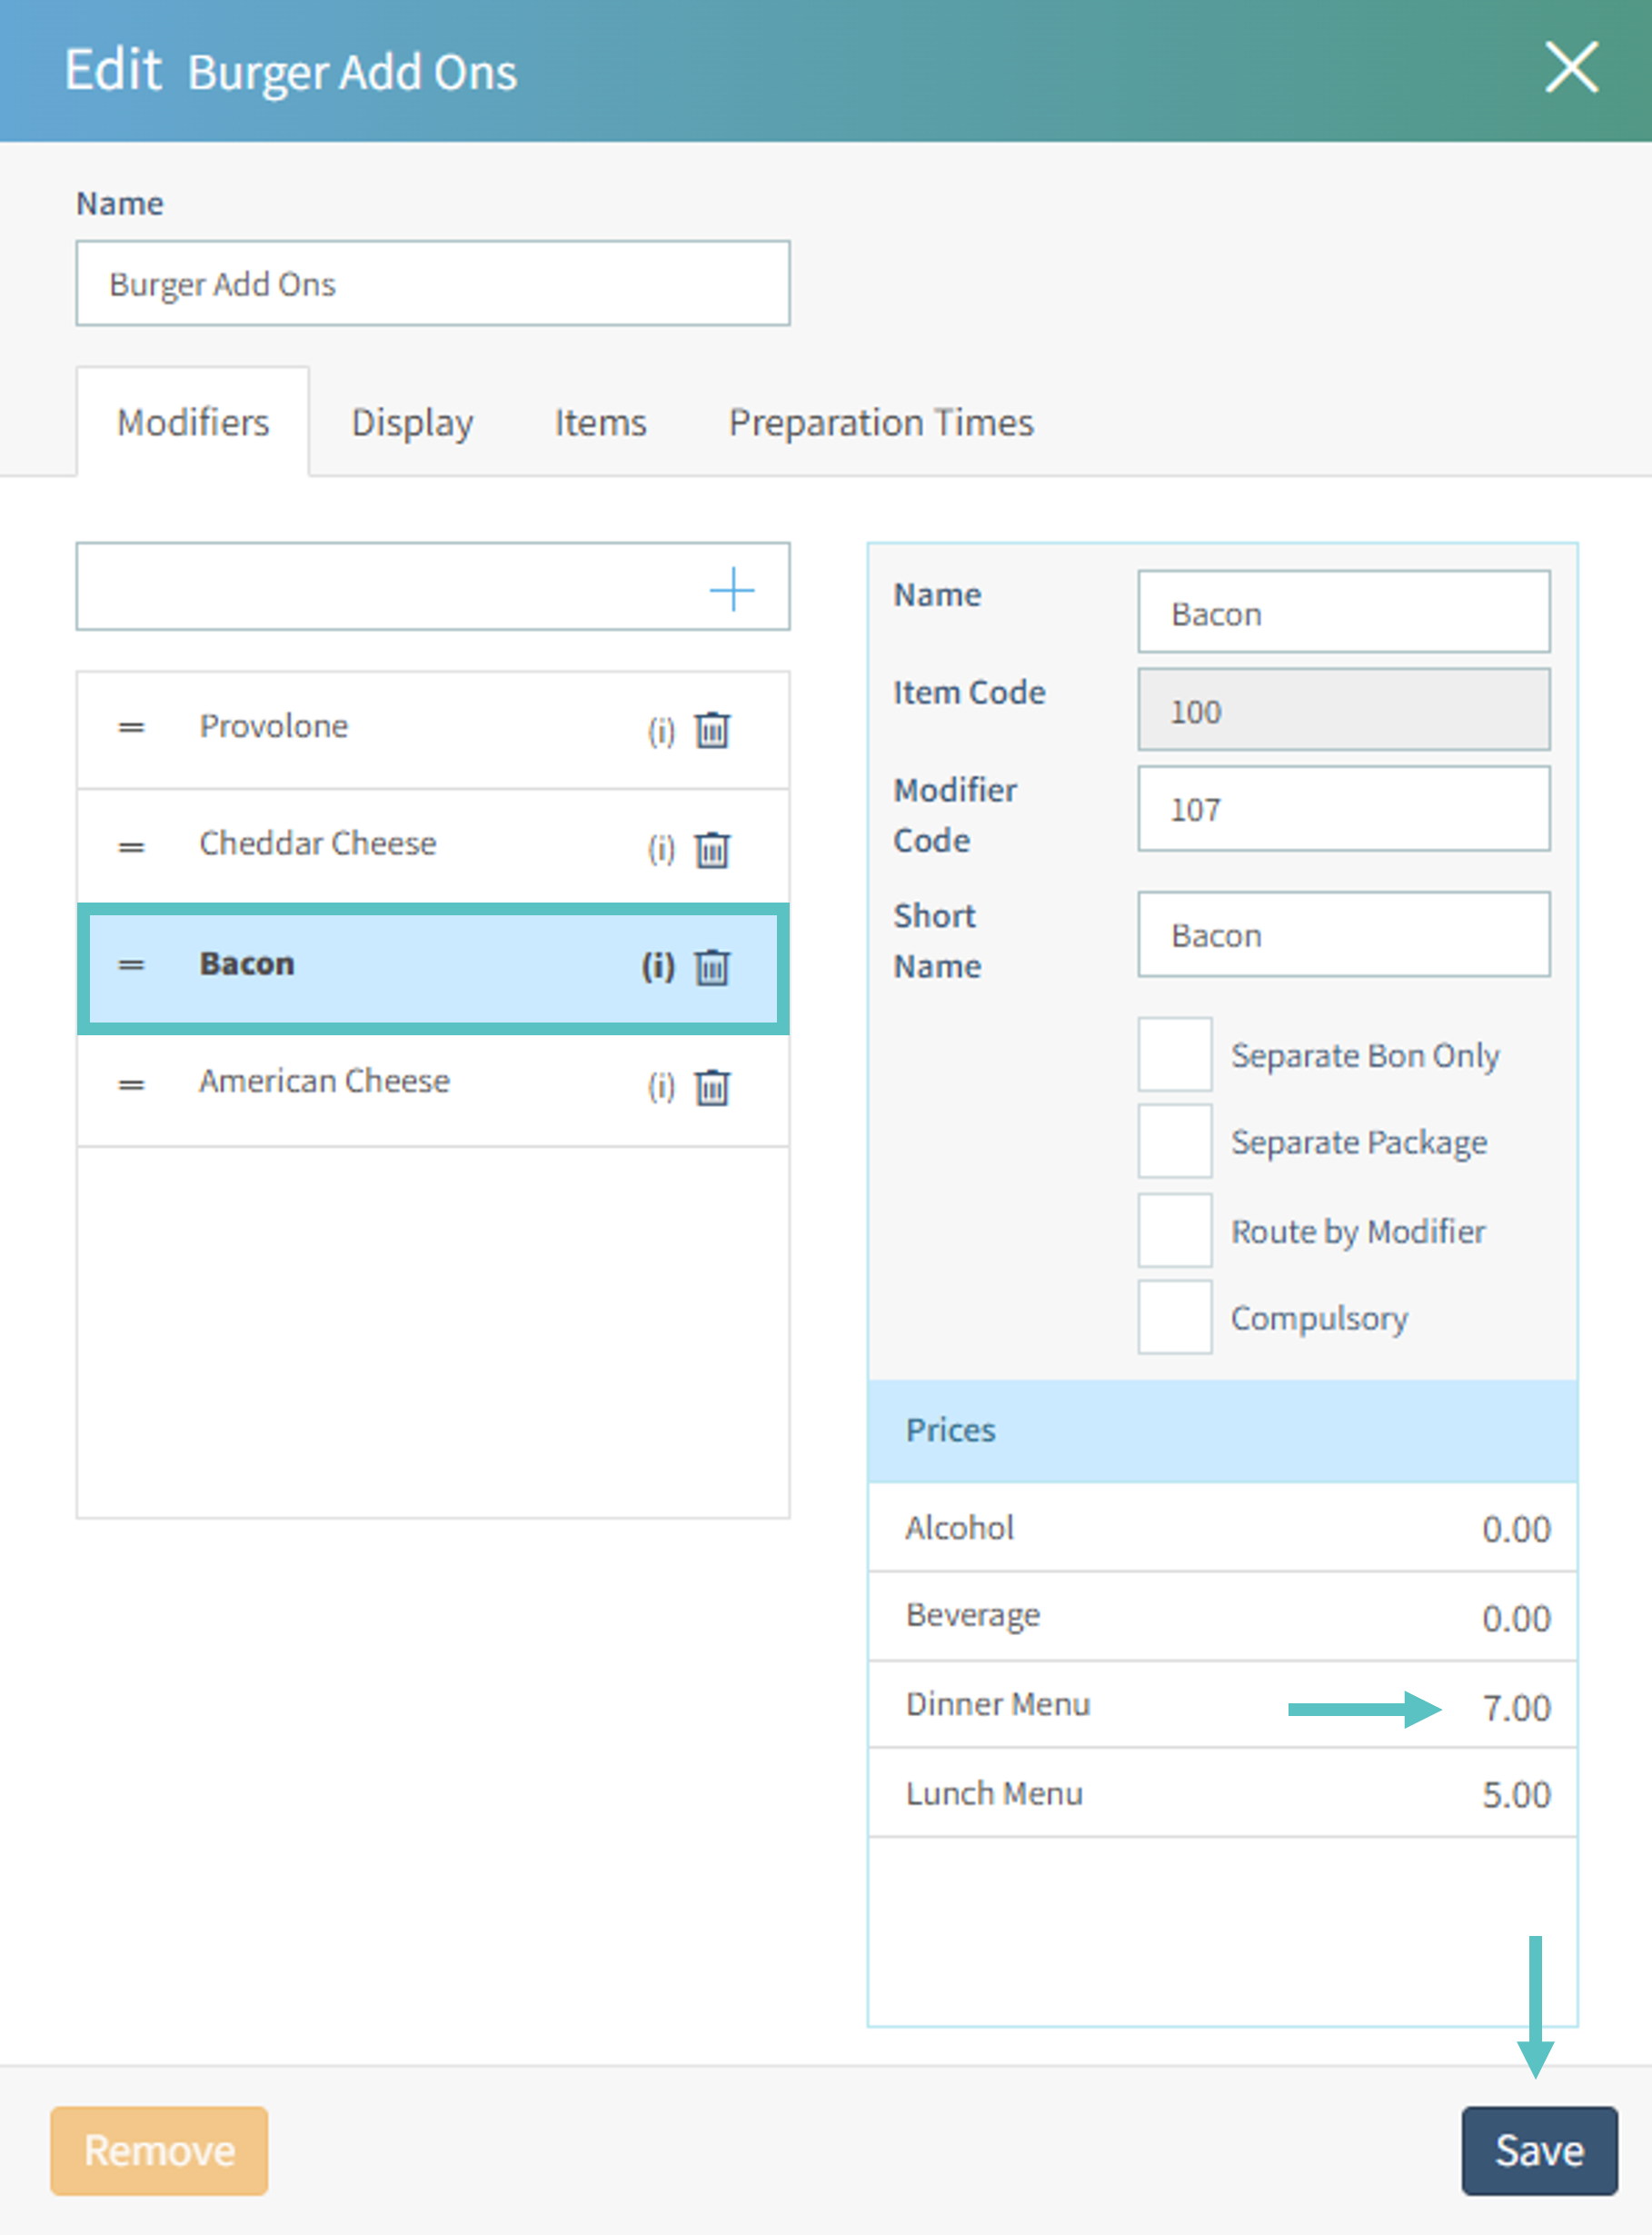
Select the modifier you want to add the price to. On the right under Prices, double-click the price next to the menu name and type the additional price. Then select Save
-
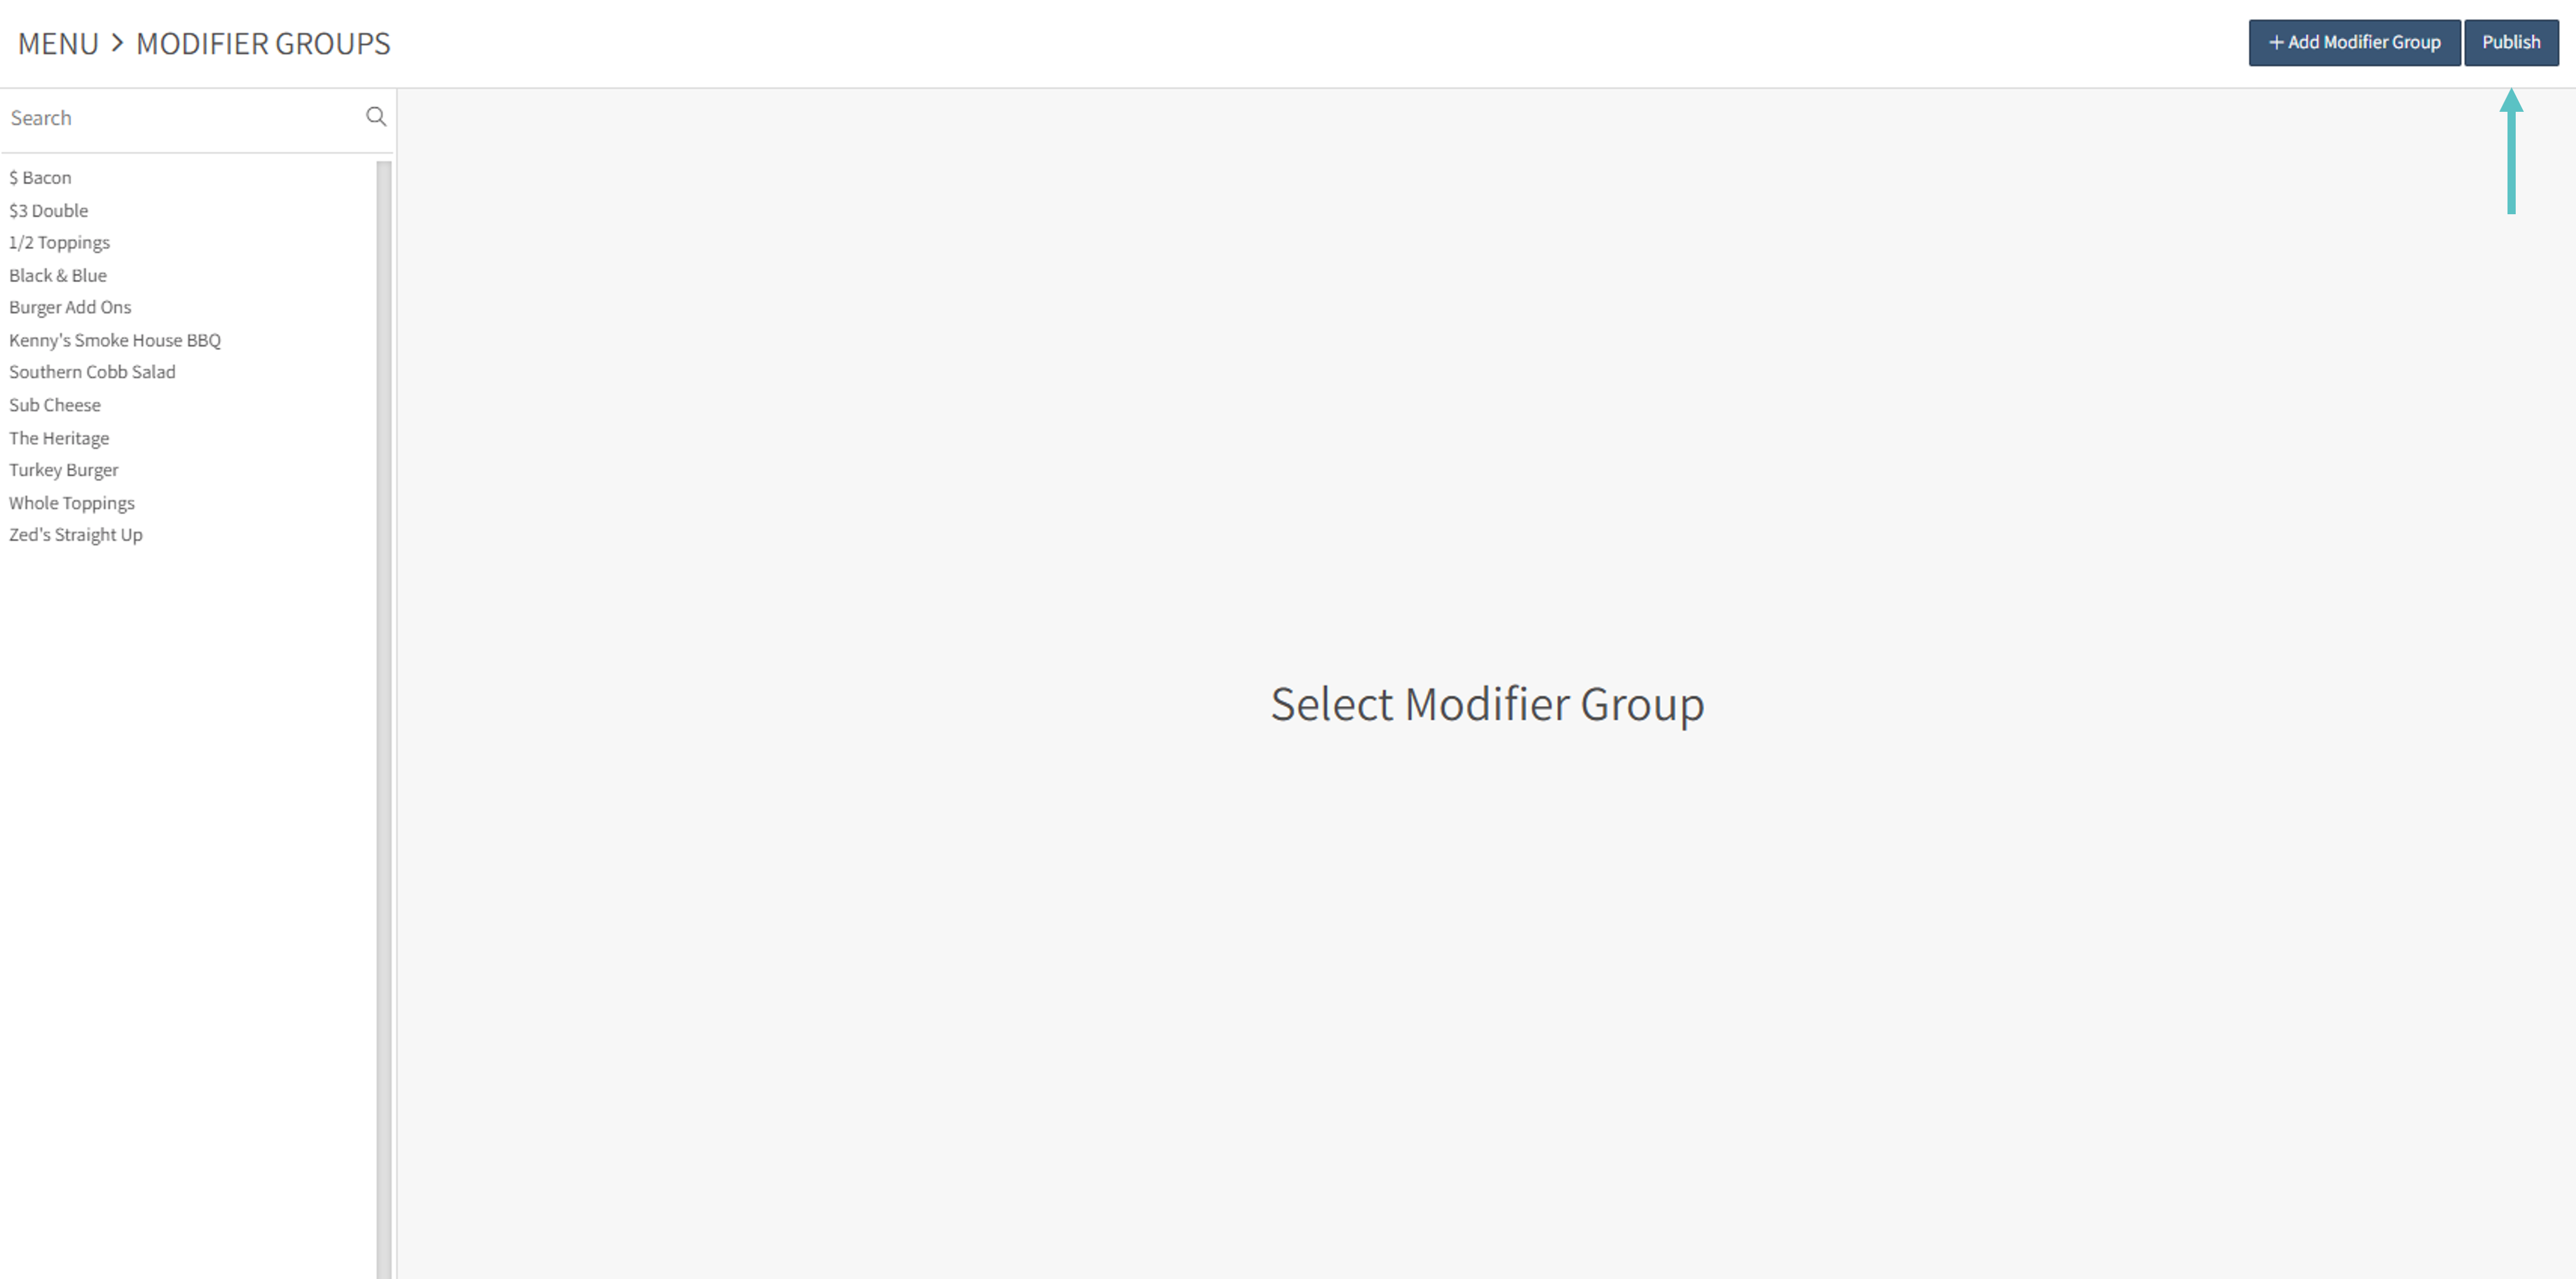
Select Publish to update the changes in the PAD
-
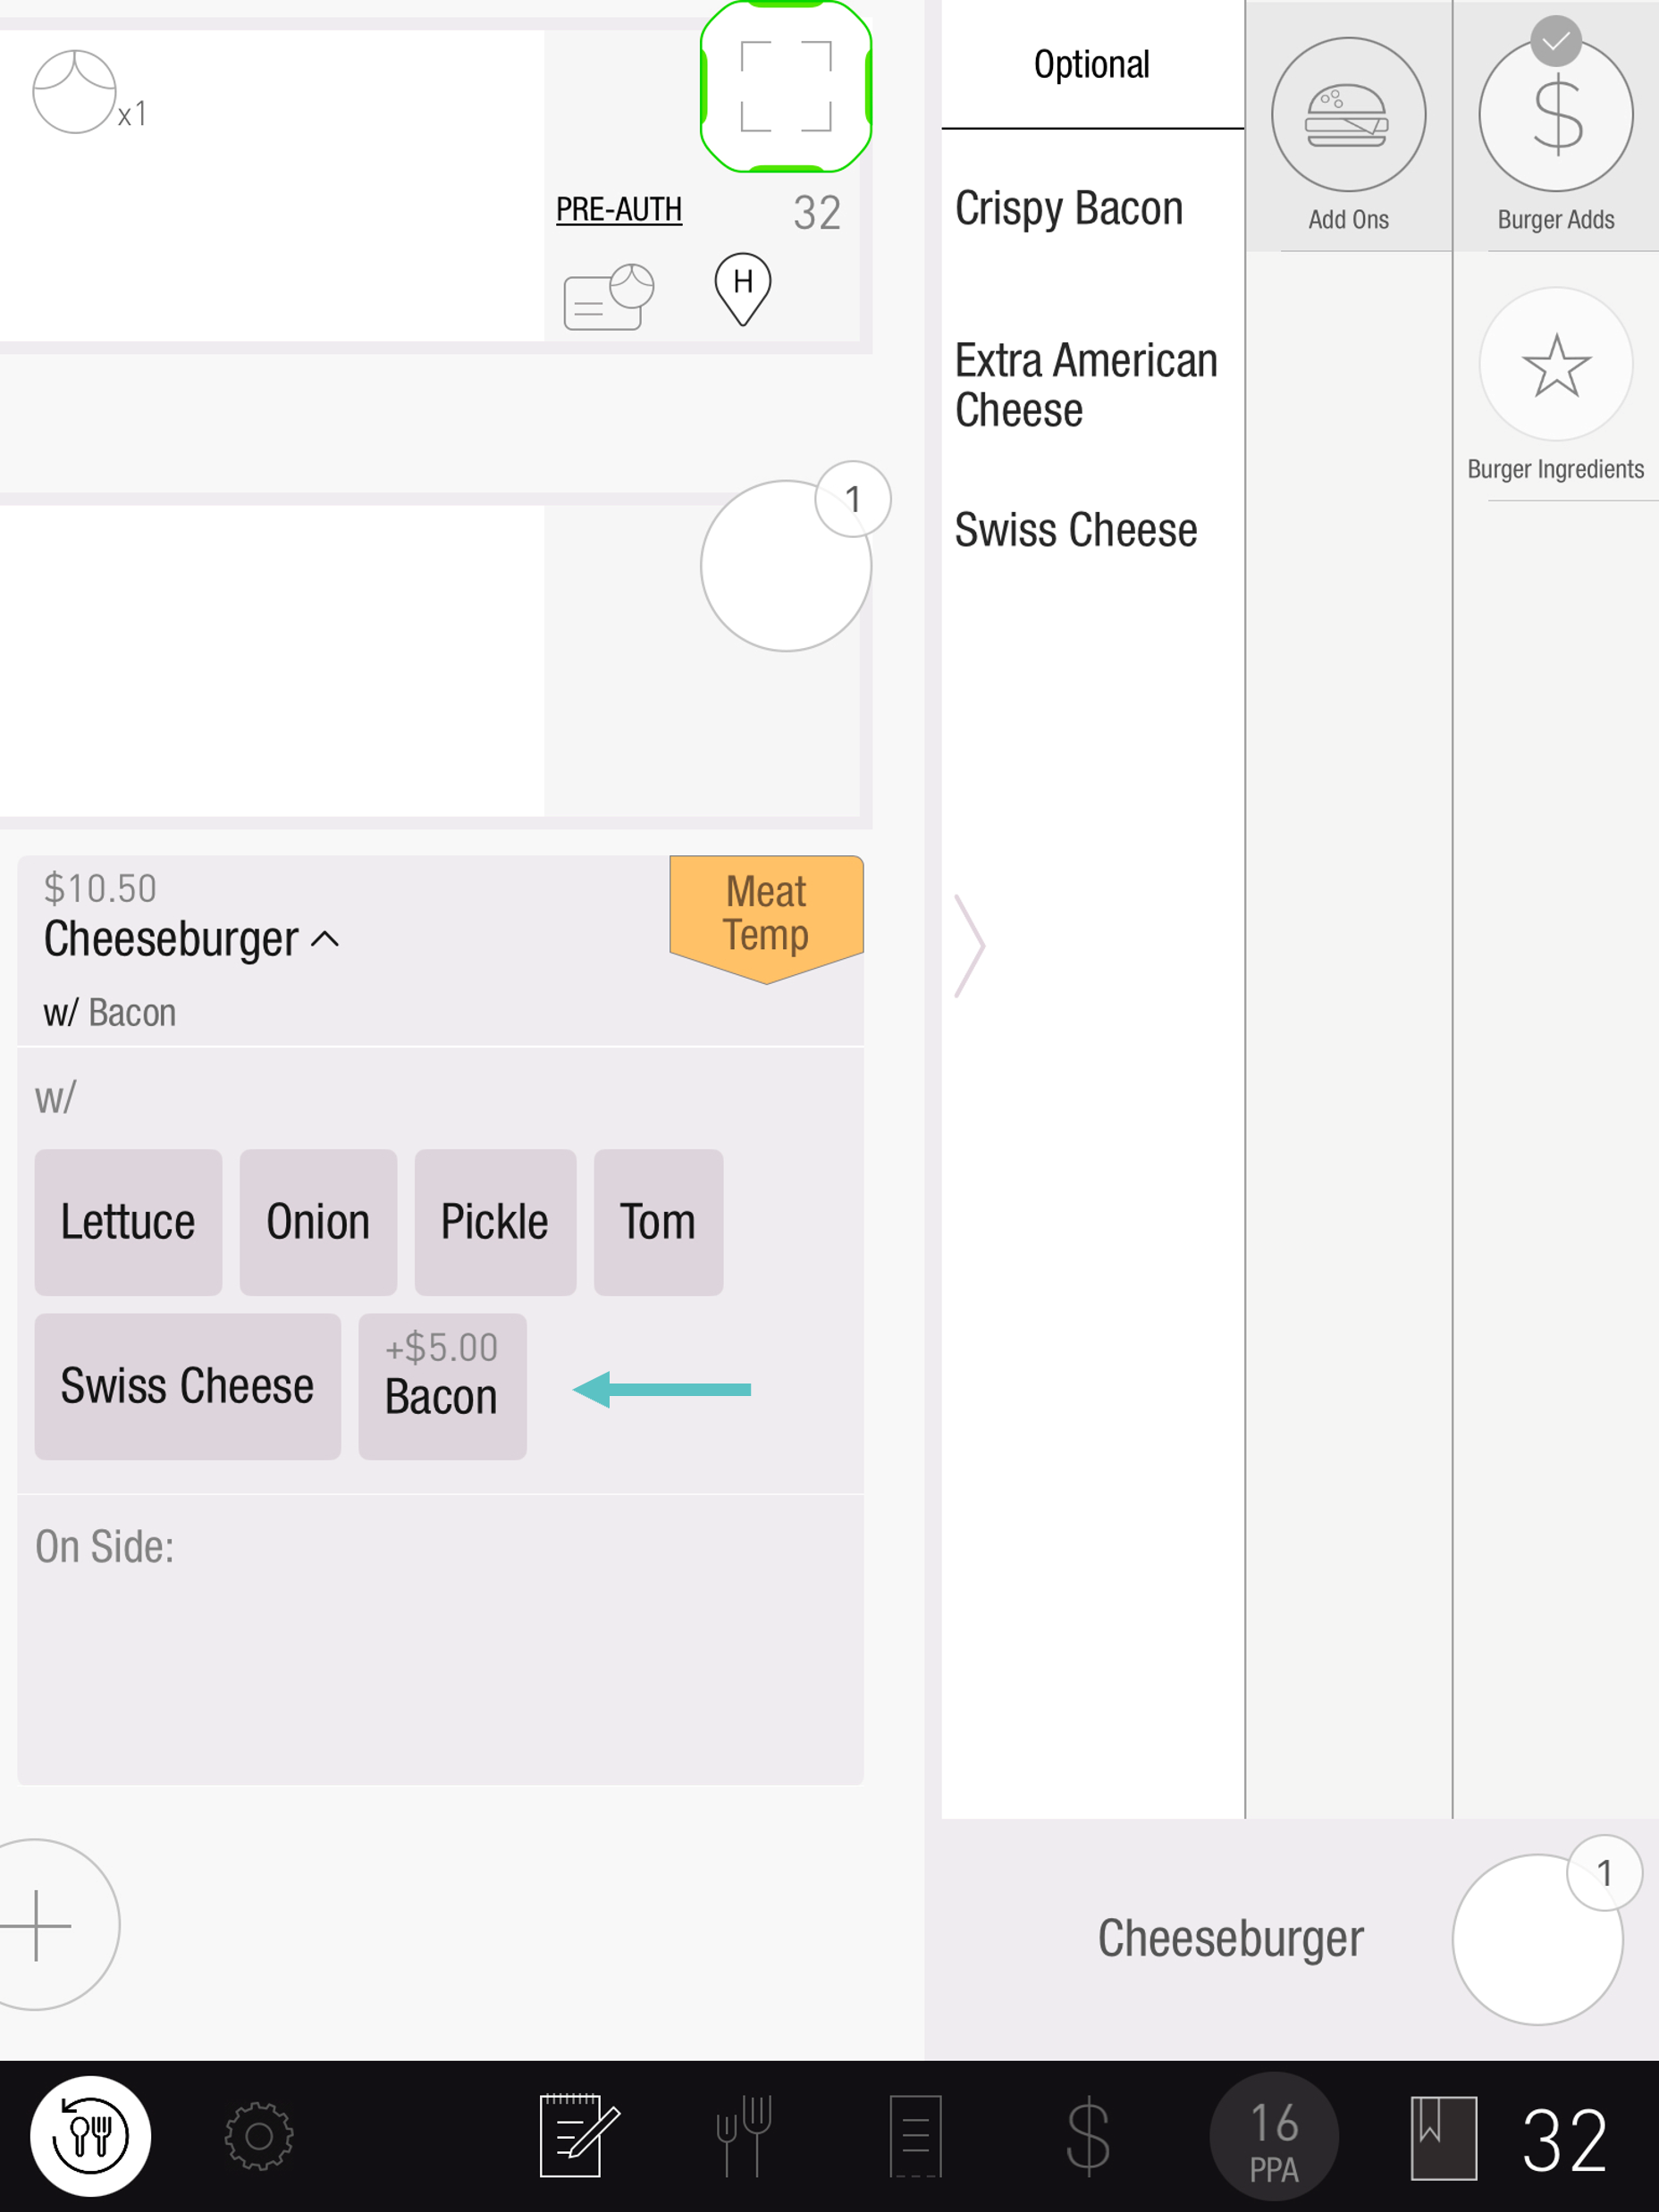
The new price will now show with the modifier
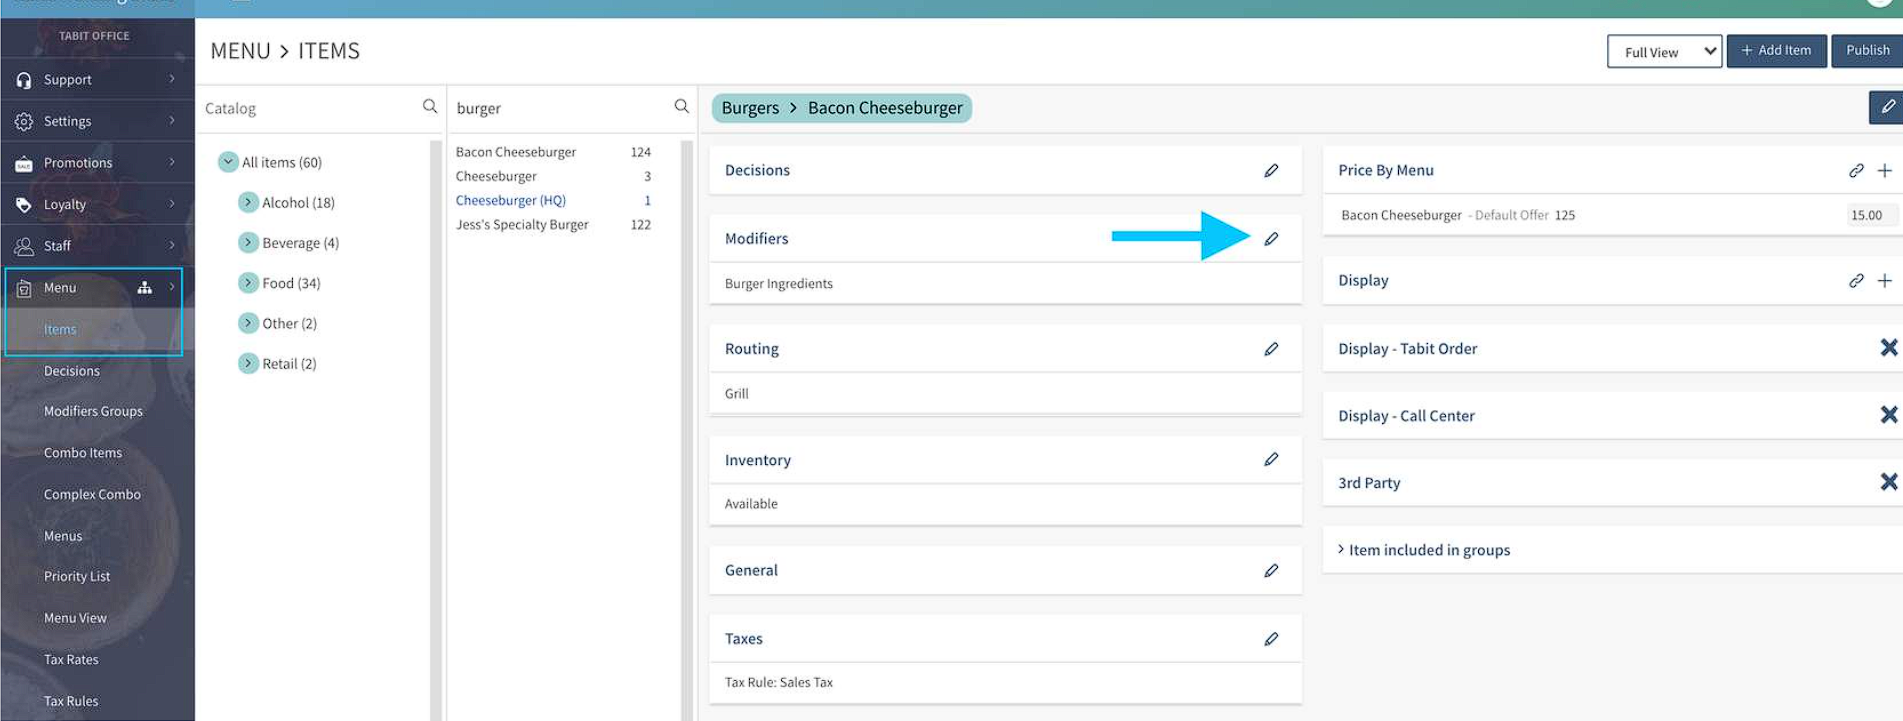
How to Customize a Modifier Group by Item
-
Under Menu and Items, search for the appropriate item
-
Click on the pencil to open up the Modifier Group
-
Once inside the item, click and drag the Modifier Groups around to determine which appears first on the PAD
-
To edit how the modifier(s) attach to the item, click into the name of the Modifier Group
-
Click on the "W/" and choose the correct option
-
Select "Save" to update the Item and then select "Publish" to update the changes and send the information to the Cloud
Best practice is to prioritize the Modifier Group that includes upsell opportunities to reinforce the additional options
See How to Customize a Modifier Group by Item
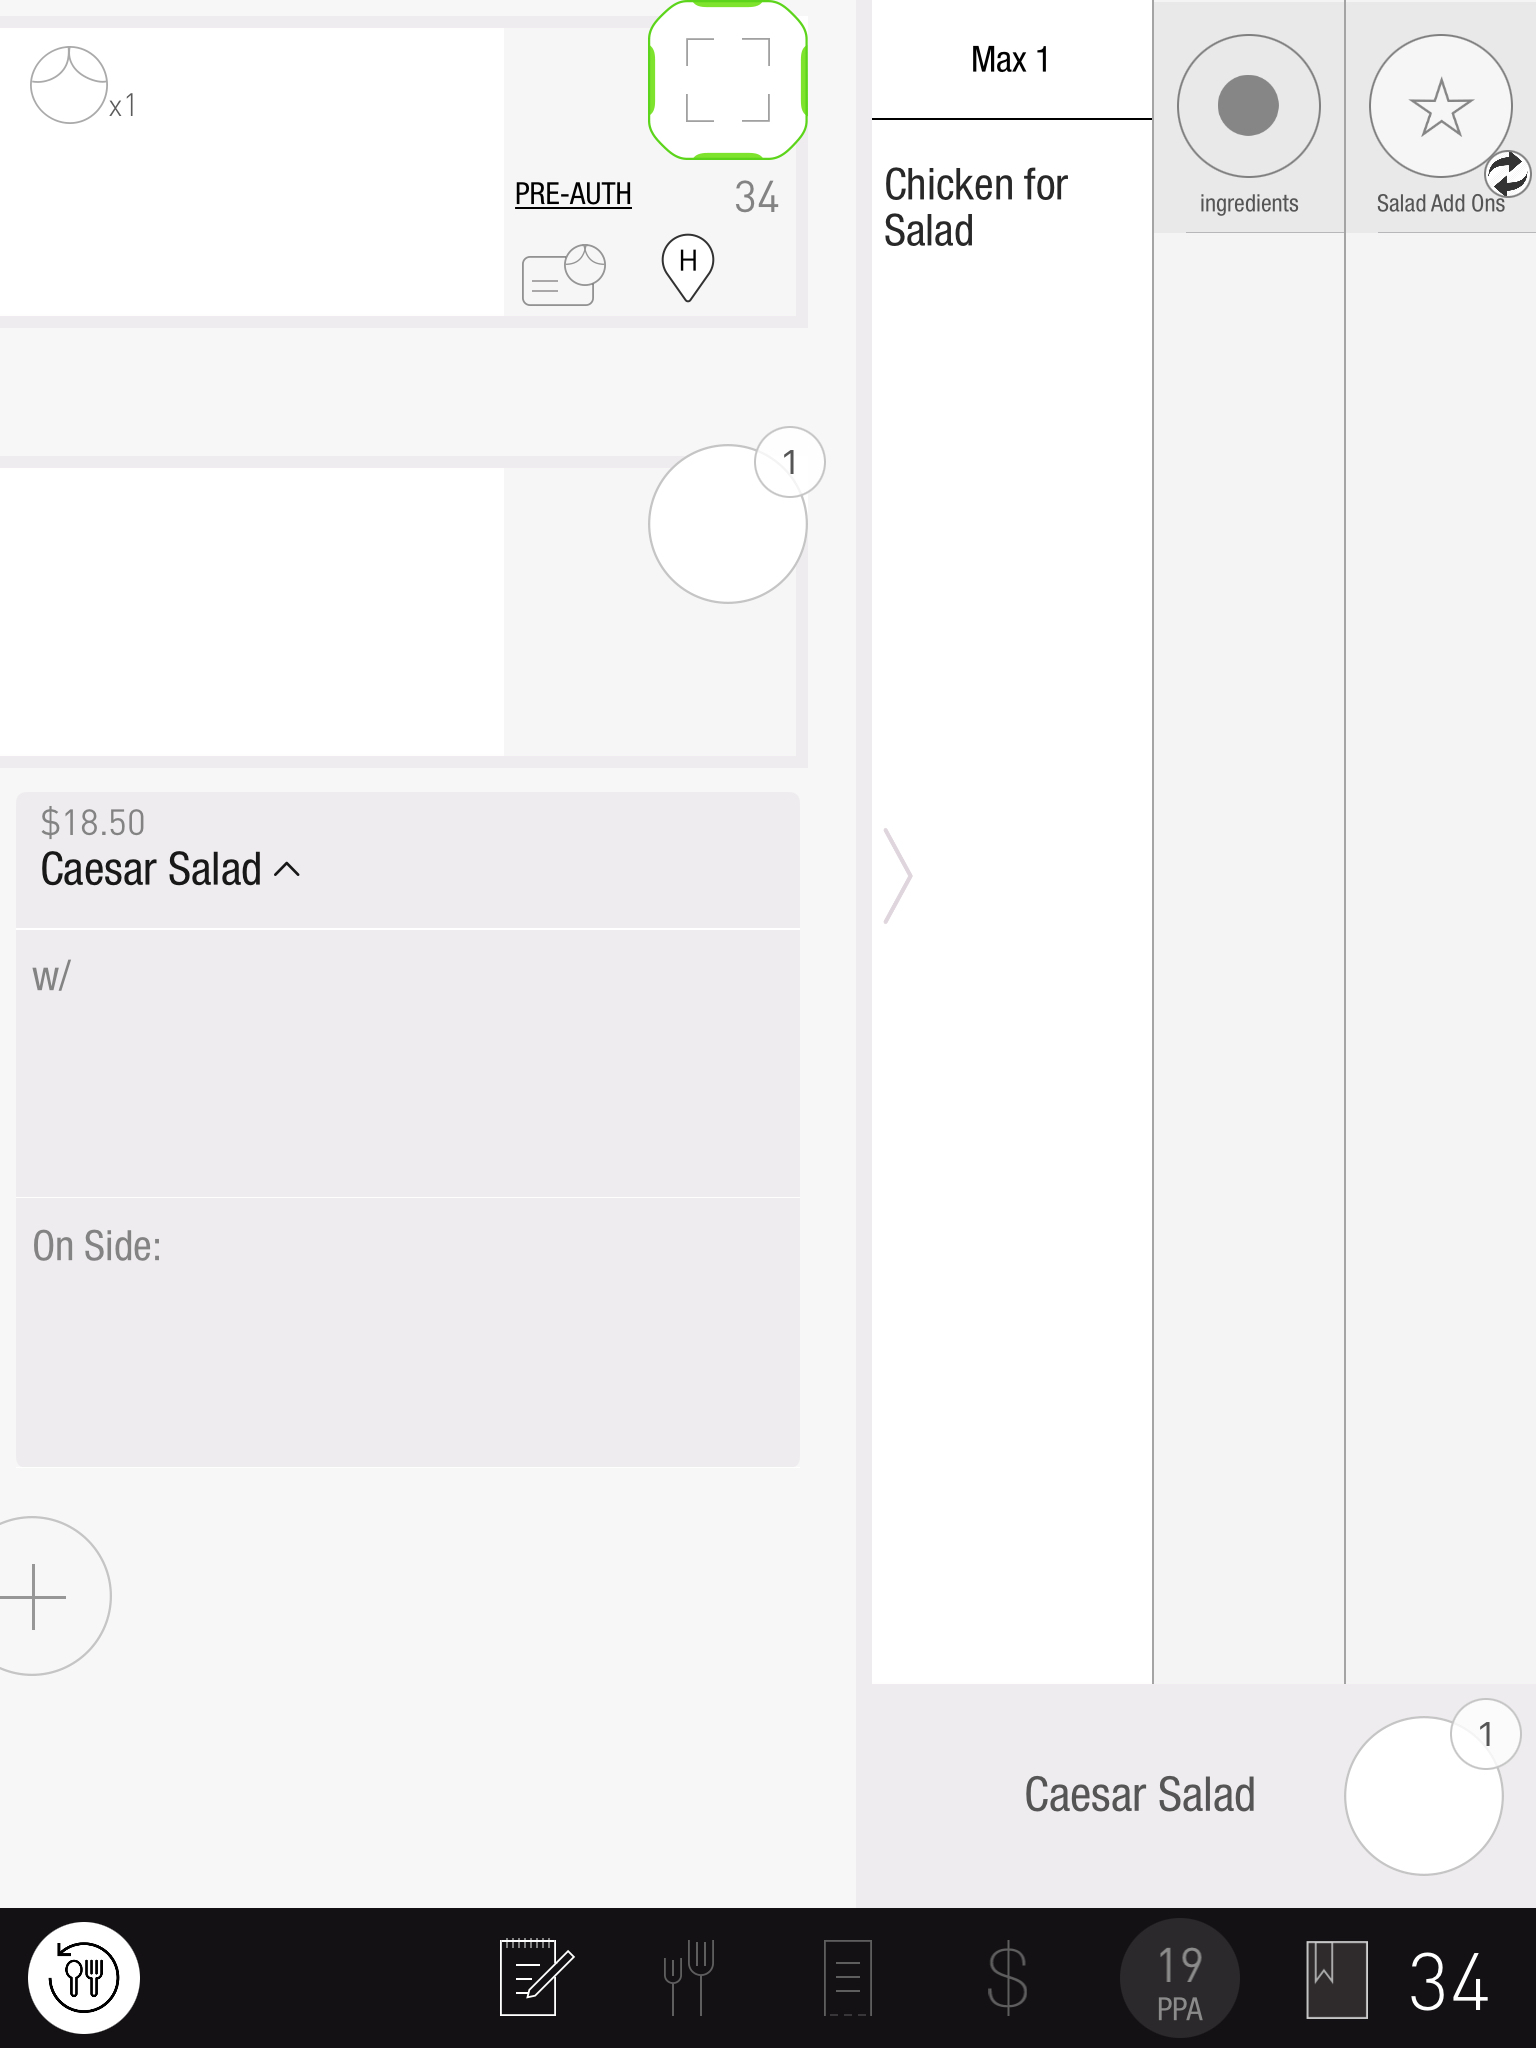
What are Minimums and Maximums?
-
Minimums and maximums are best used when the number of items in a Modifier Group needs to be managed
-
Ex: the Cheeseburger always comes with cheese so prevent errors setting a minimum and maximum of 1 forces the user to make a selection before ordering the item