Tabit Office

OFC V9.3
New
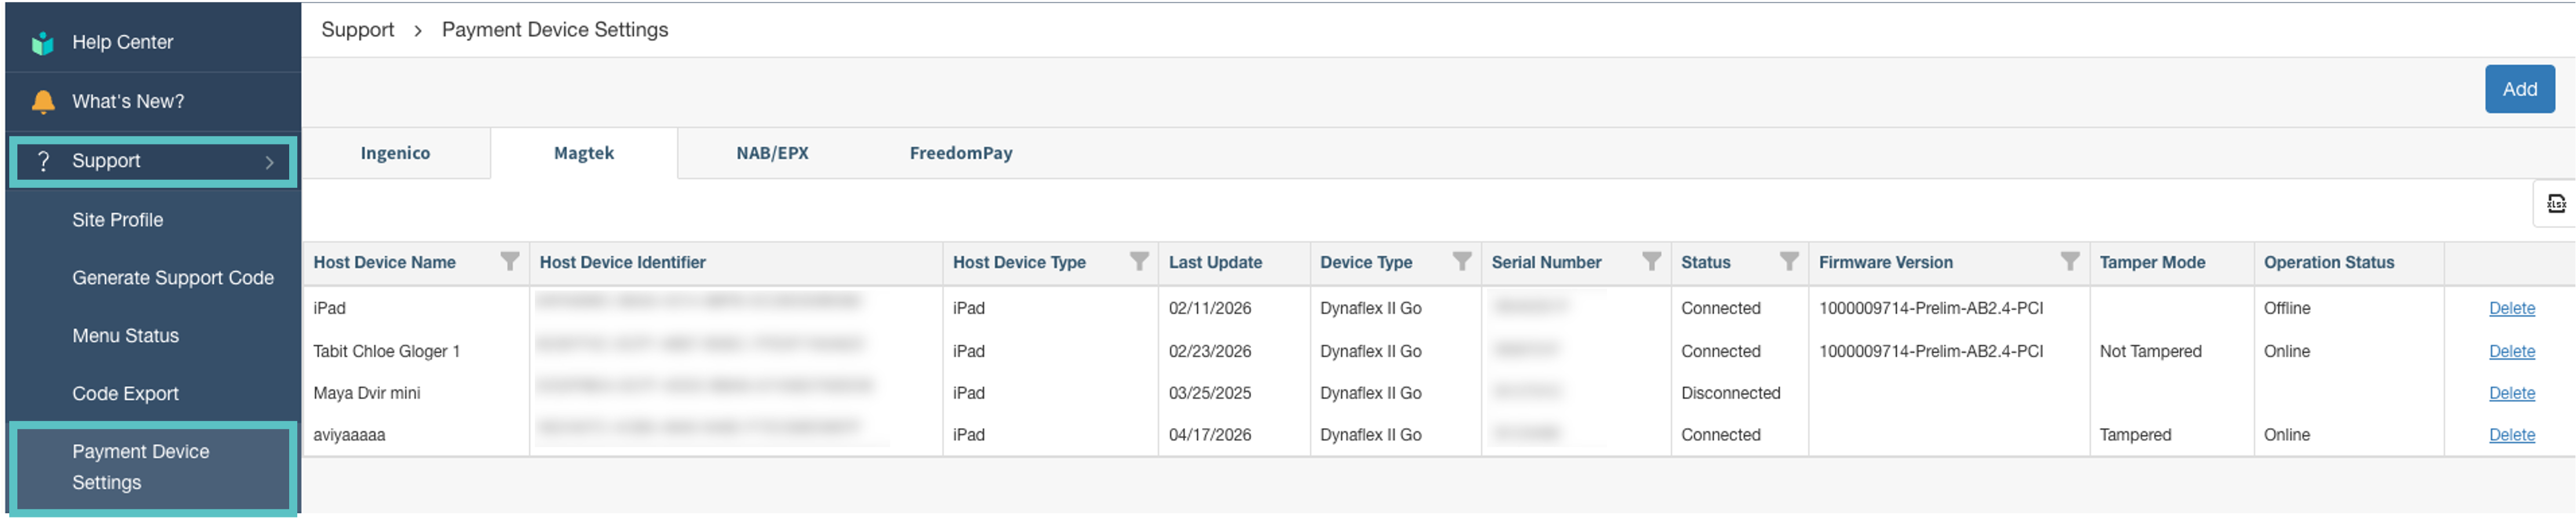
Manage MagTek devices through the Payment Device Settings screen
Support and org admins can now view, monitor, and manage MagTek-connected PADs directly in OFC. The new MagTek tab lists all MagTek-configured devices with connectivity, firmware, and tamper status. Columns are sortable and filterable. Devices can be deleted to clear their MagTek configuration.
Notes:
-
Adding or editing MagTek devices is not supported here
-
MagTek-configured devices are also blocked from appearing in the OFC Add Device flow
Where to find it:
-
In Tabit Office, go to Support > Payment Device Settings
-
Select Magtek. From here you can view all MagTek devices and details
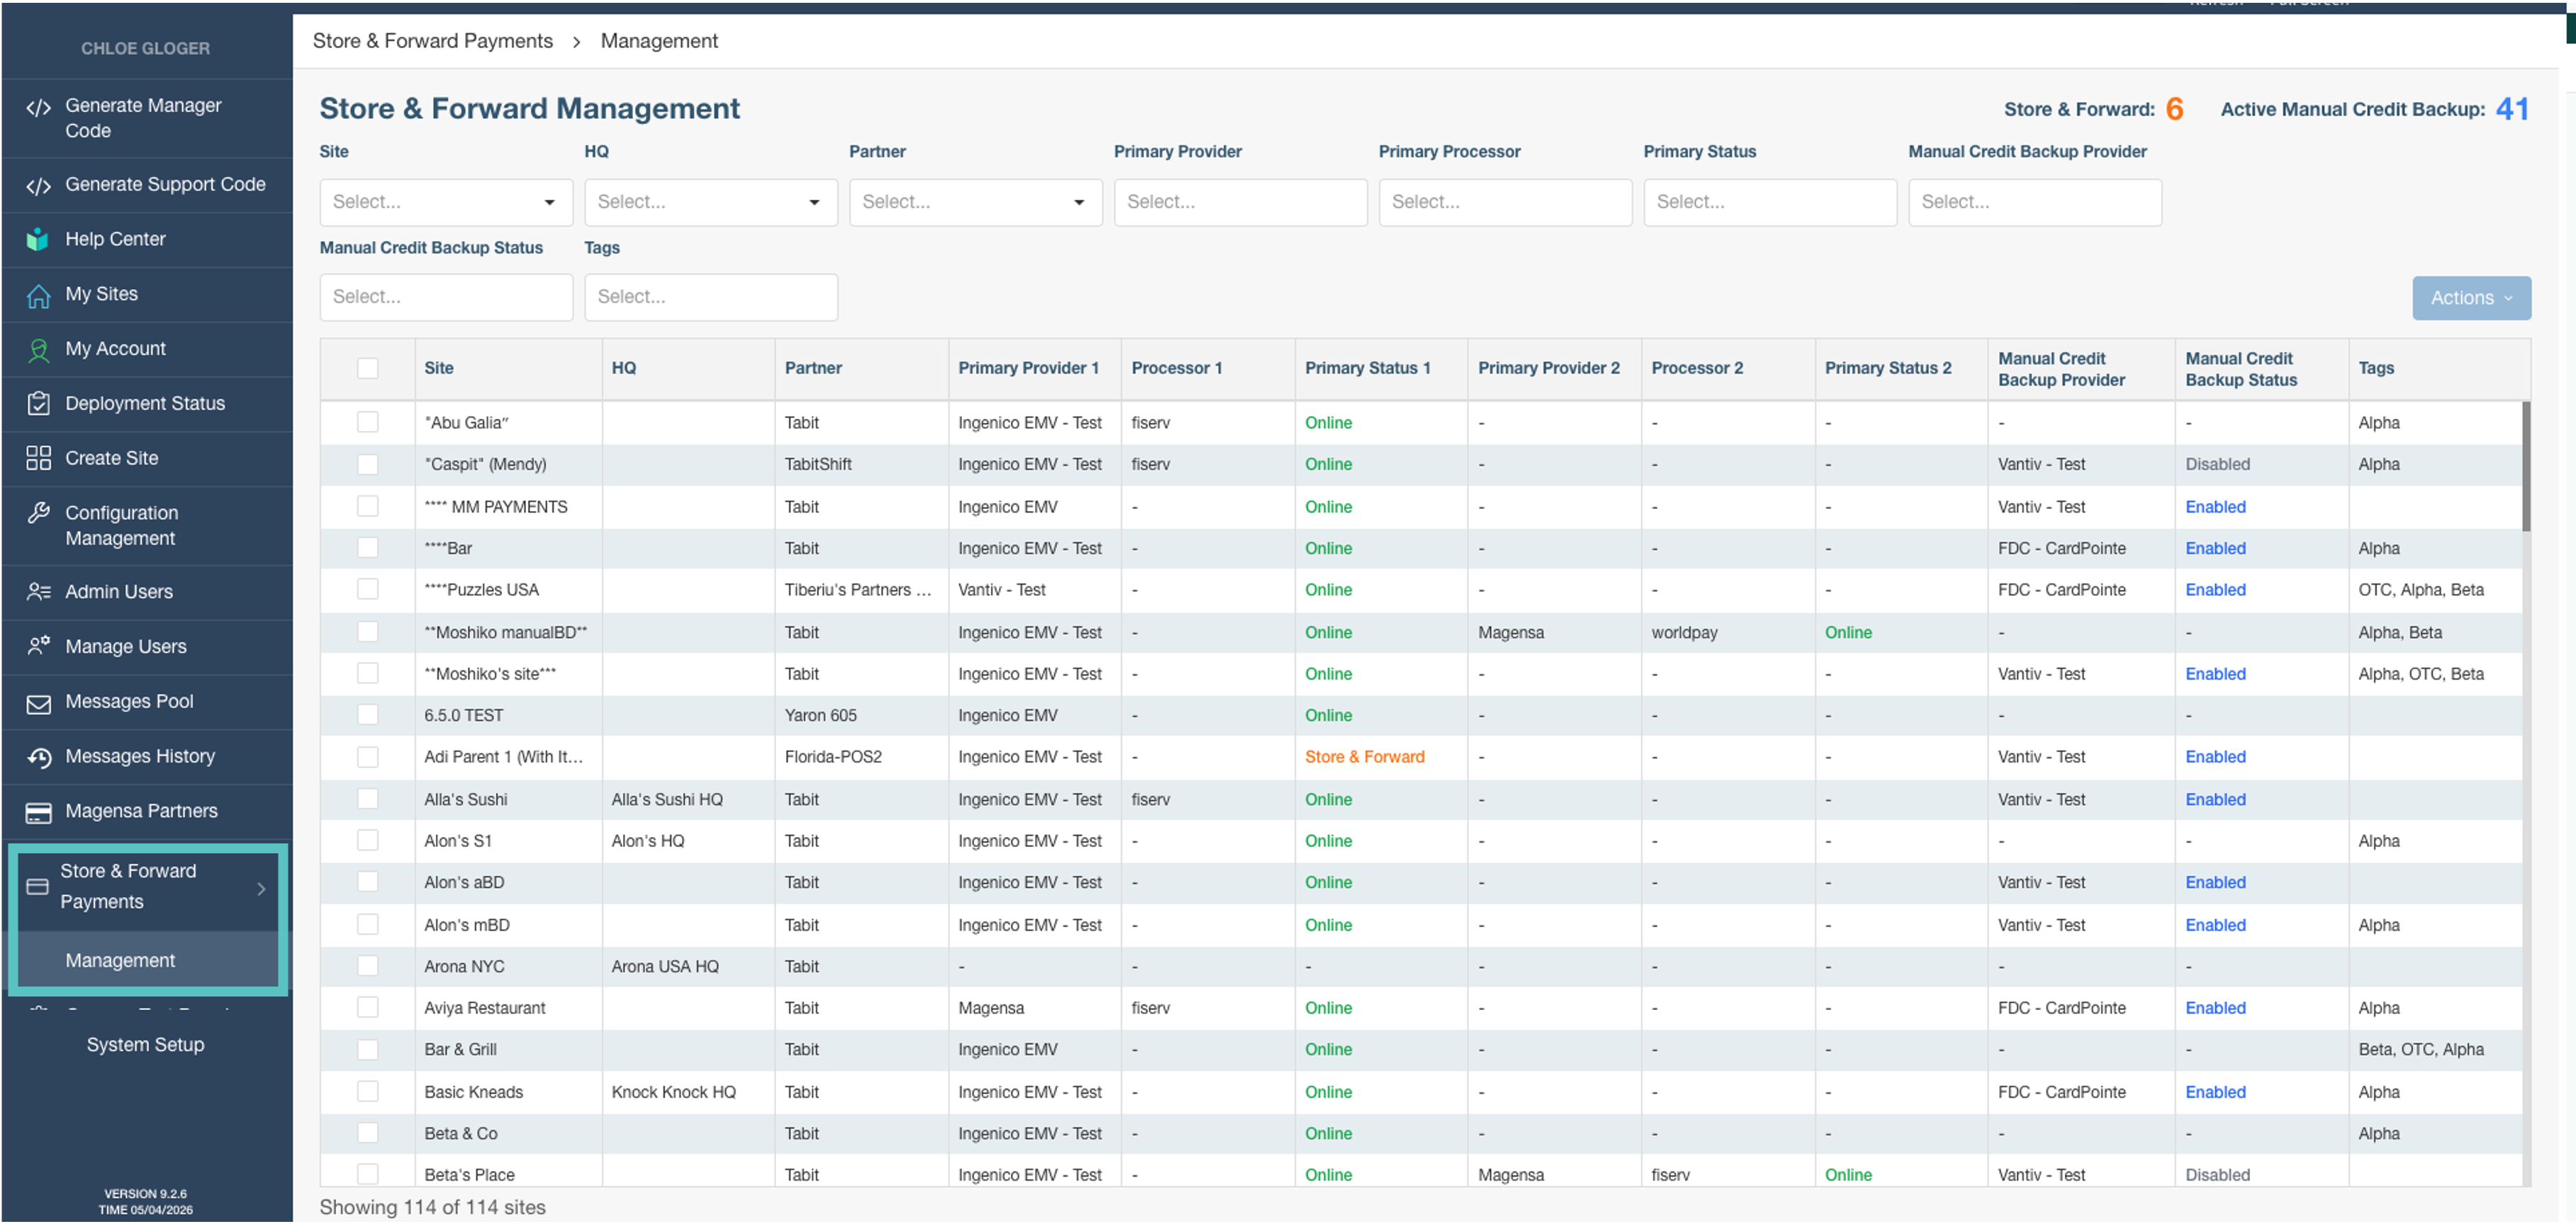
Manage Store & Forward events from one location
The new Store & Forward management screen provides faster visibility and control during payment outages, with smart filtering, a clearer site overview, and expanded action capabilities.
What's new:
-
HQ and Processor filters: Quickly scope the view to specific HQs or payment processors, so you're only looking at the sites that matter during an event
-
Two primary accounts per site: Sites can now have two primary payment accounts. Both are now visible in the table (Provider, Processor, and Status for each) and can be actioned independently
-
Manual Credit Backup controls: Easier flow from a central location
-
Smarter confirmation flow: When activating or deactivating S&F for sites with Ingenico or MagTek providers, you can choose which providers to include before confirming
Where to find it:
In Tabit Office, before selecting a site go to Store & Forward Payments > Management
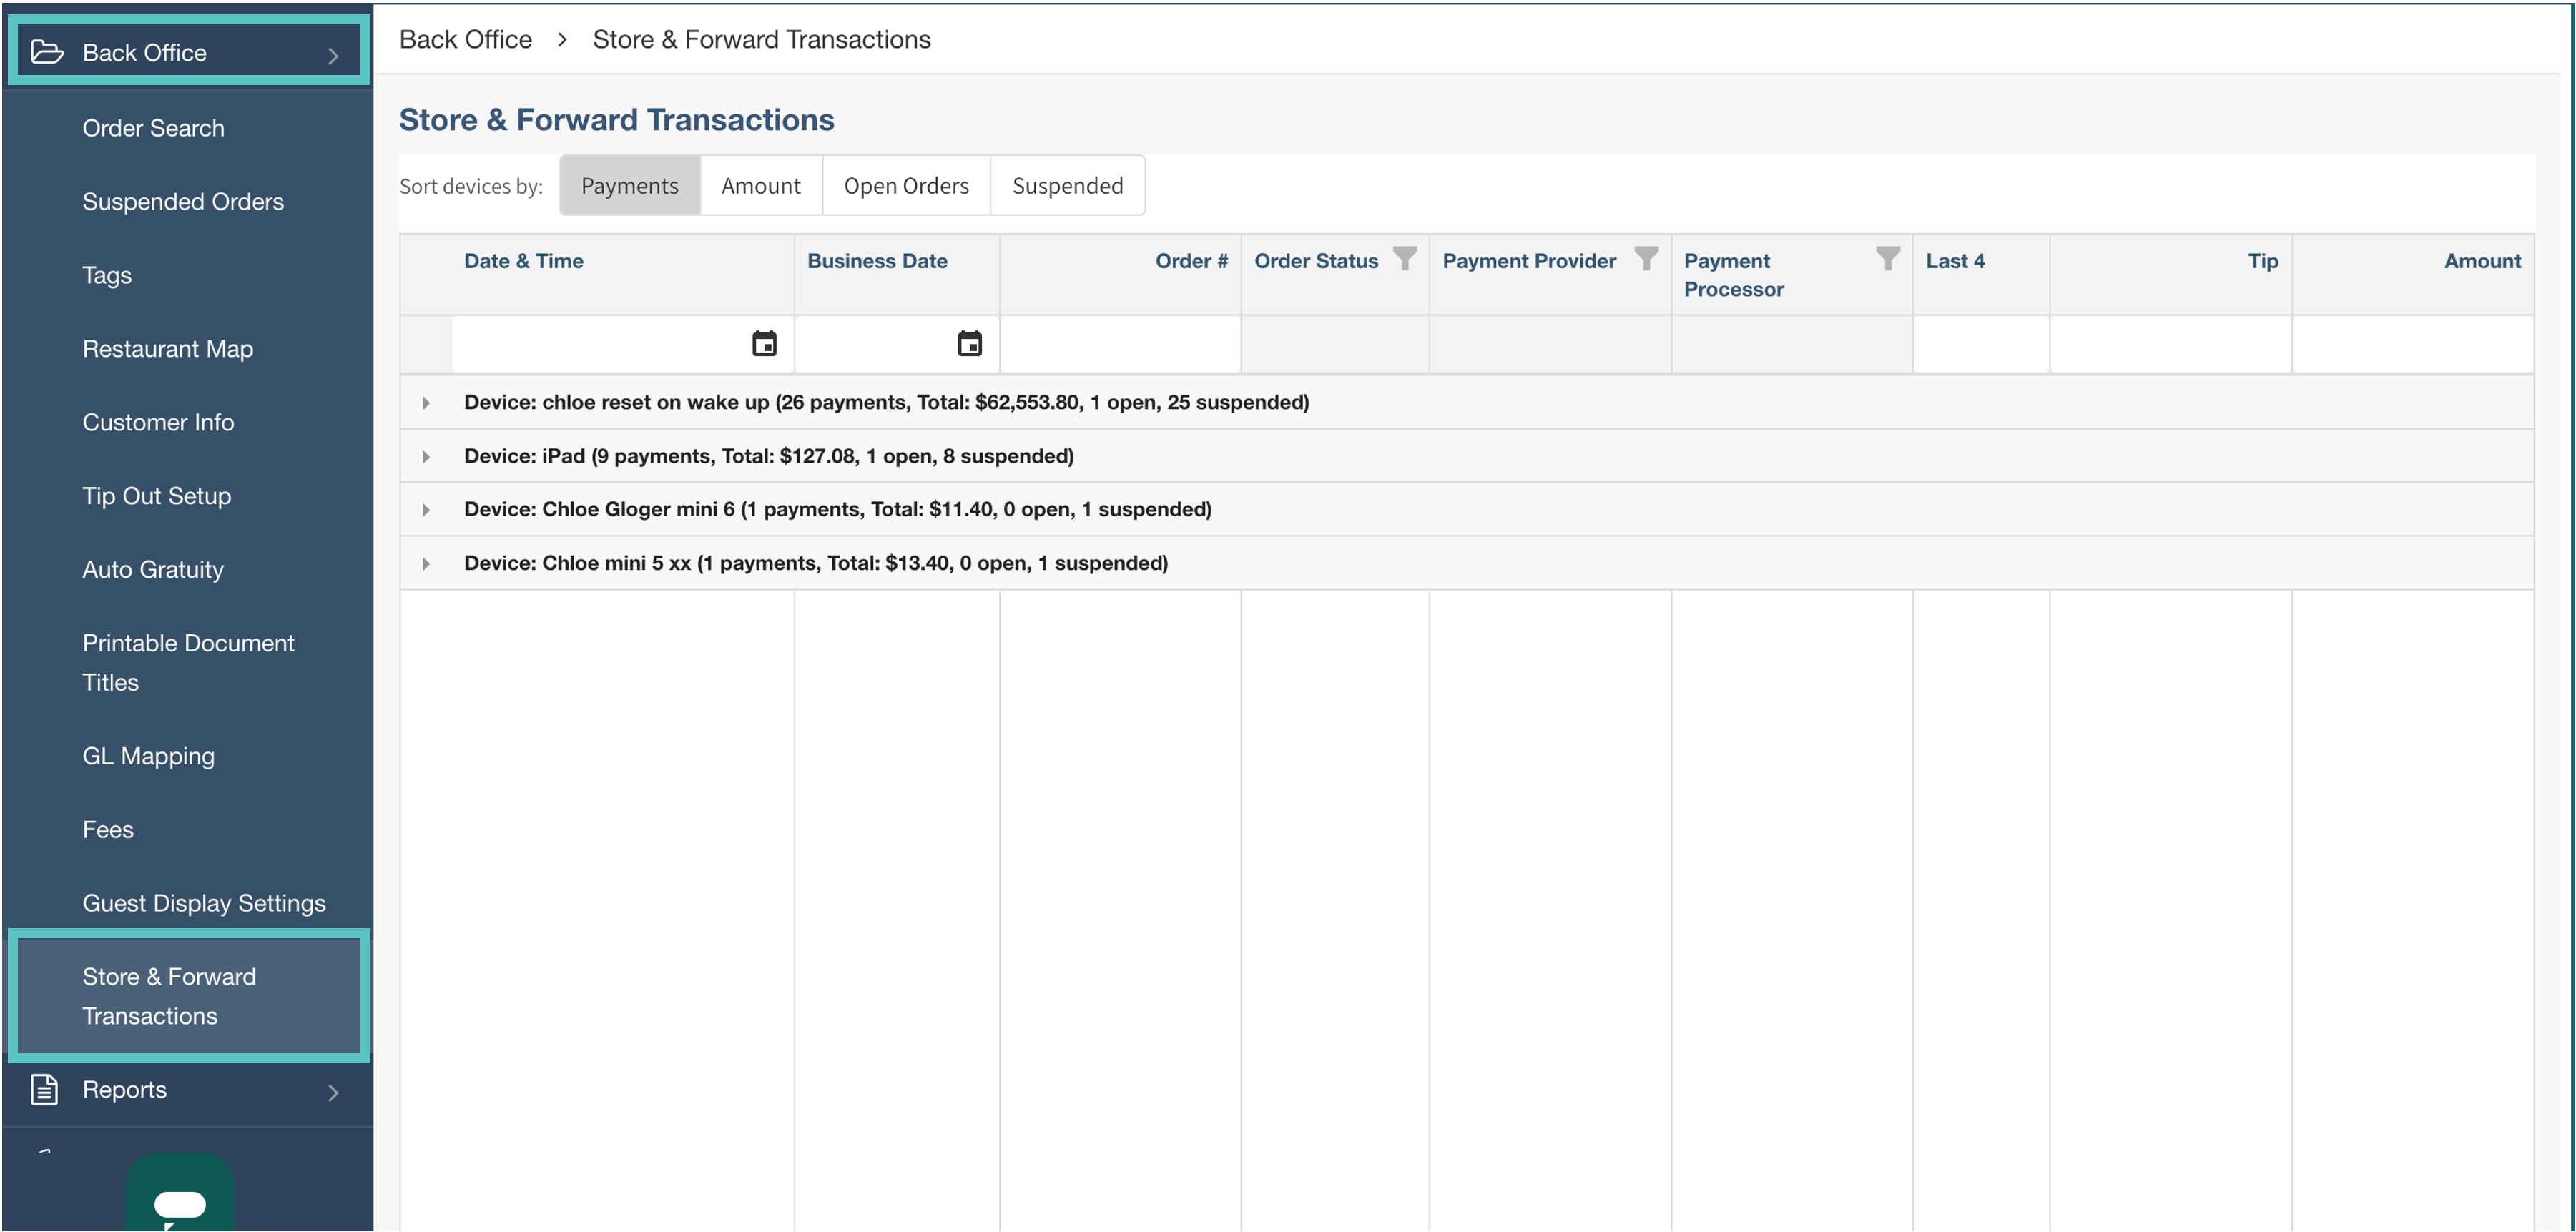
Store & Forward payment visibility
Managers and admin can now see all Store & Forward payment orders in one place, no more blind spots after an offline event.
Before: Only suspended orders appeared in Tabit Office. Any open orders tied to Store & Forward payments were invisible, making it hard to know what needed follow-up after connectivity issues.
Now: A dedicated Store & Forward Transactions page consolidates all affected orders regardless of status. Admins and Partners get a cross-site summary view; Restaurant Managers see a page scoped to their own location.
Store & Forward Transactions — controls access to this page. It must be granted by a Super User or a user who already has the permission assigned to themselves.
Where to find it:
Restaurant Managers:
In Tabit Office, go to Back Office > Store & Forward Transactions to view payments grouped by device, with order status, processor, last 4 digits, tip, and amount
Improvement
Payment Assistant updates now complete successfully in Payment Assist
Payment Assistants in a Payment Assist flow can now fully complete payment-related actions, including sending receipts and managing offline payments, without errors.
Before: In a Payment Assist session, the secondary device (Payment Assistant) could process a payment but failed when trying to update payment details afterward. This caused two specific problems:
-
When a customer completed a client tip flow (signed, approved, selected a receipt method), the receipt was never sent or printed, the update silently failed
-
When back online after an offline payment, the Payment Assistant couldn't cancel or process the pending offline payment, both actions errored out with no update applied
Now: Payment Assistants can now successfully apply all post-payment updates in a Payment Assist flow, receipt method delivery works as expected, and offline payment management (cancel or process) completes correctly
This fix applies specifically to Payment Assist flows where a Payment Assistant device is involved. Standard single-device flows are unaffected.
Client tip flow is configured via site parameters on the PAD. Payment Assist must be enabled per site for this flow to apply.
Enhancement
Assign Job Functions directly from the employee profile
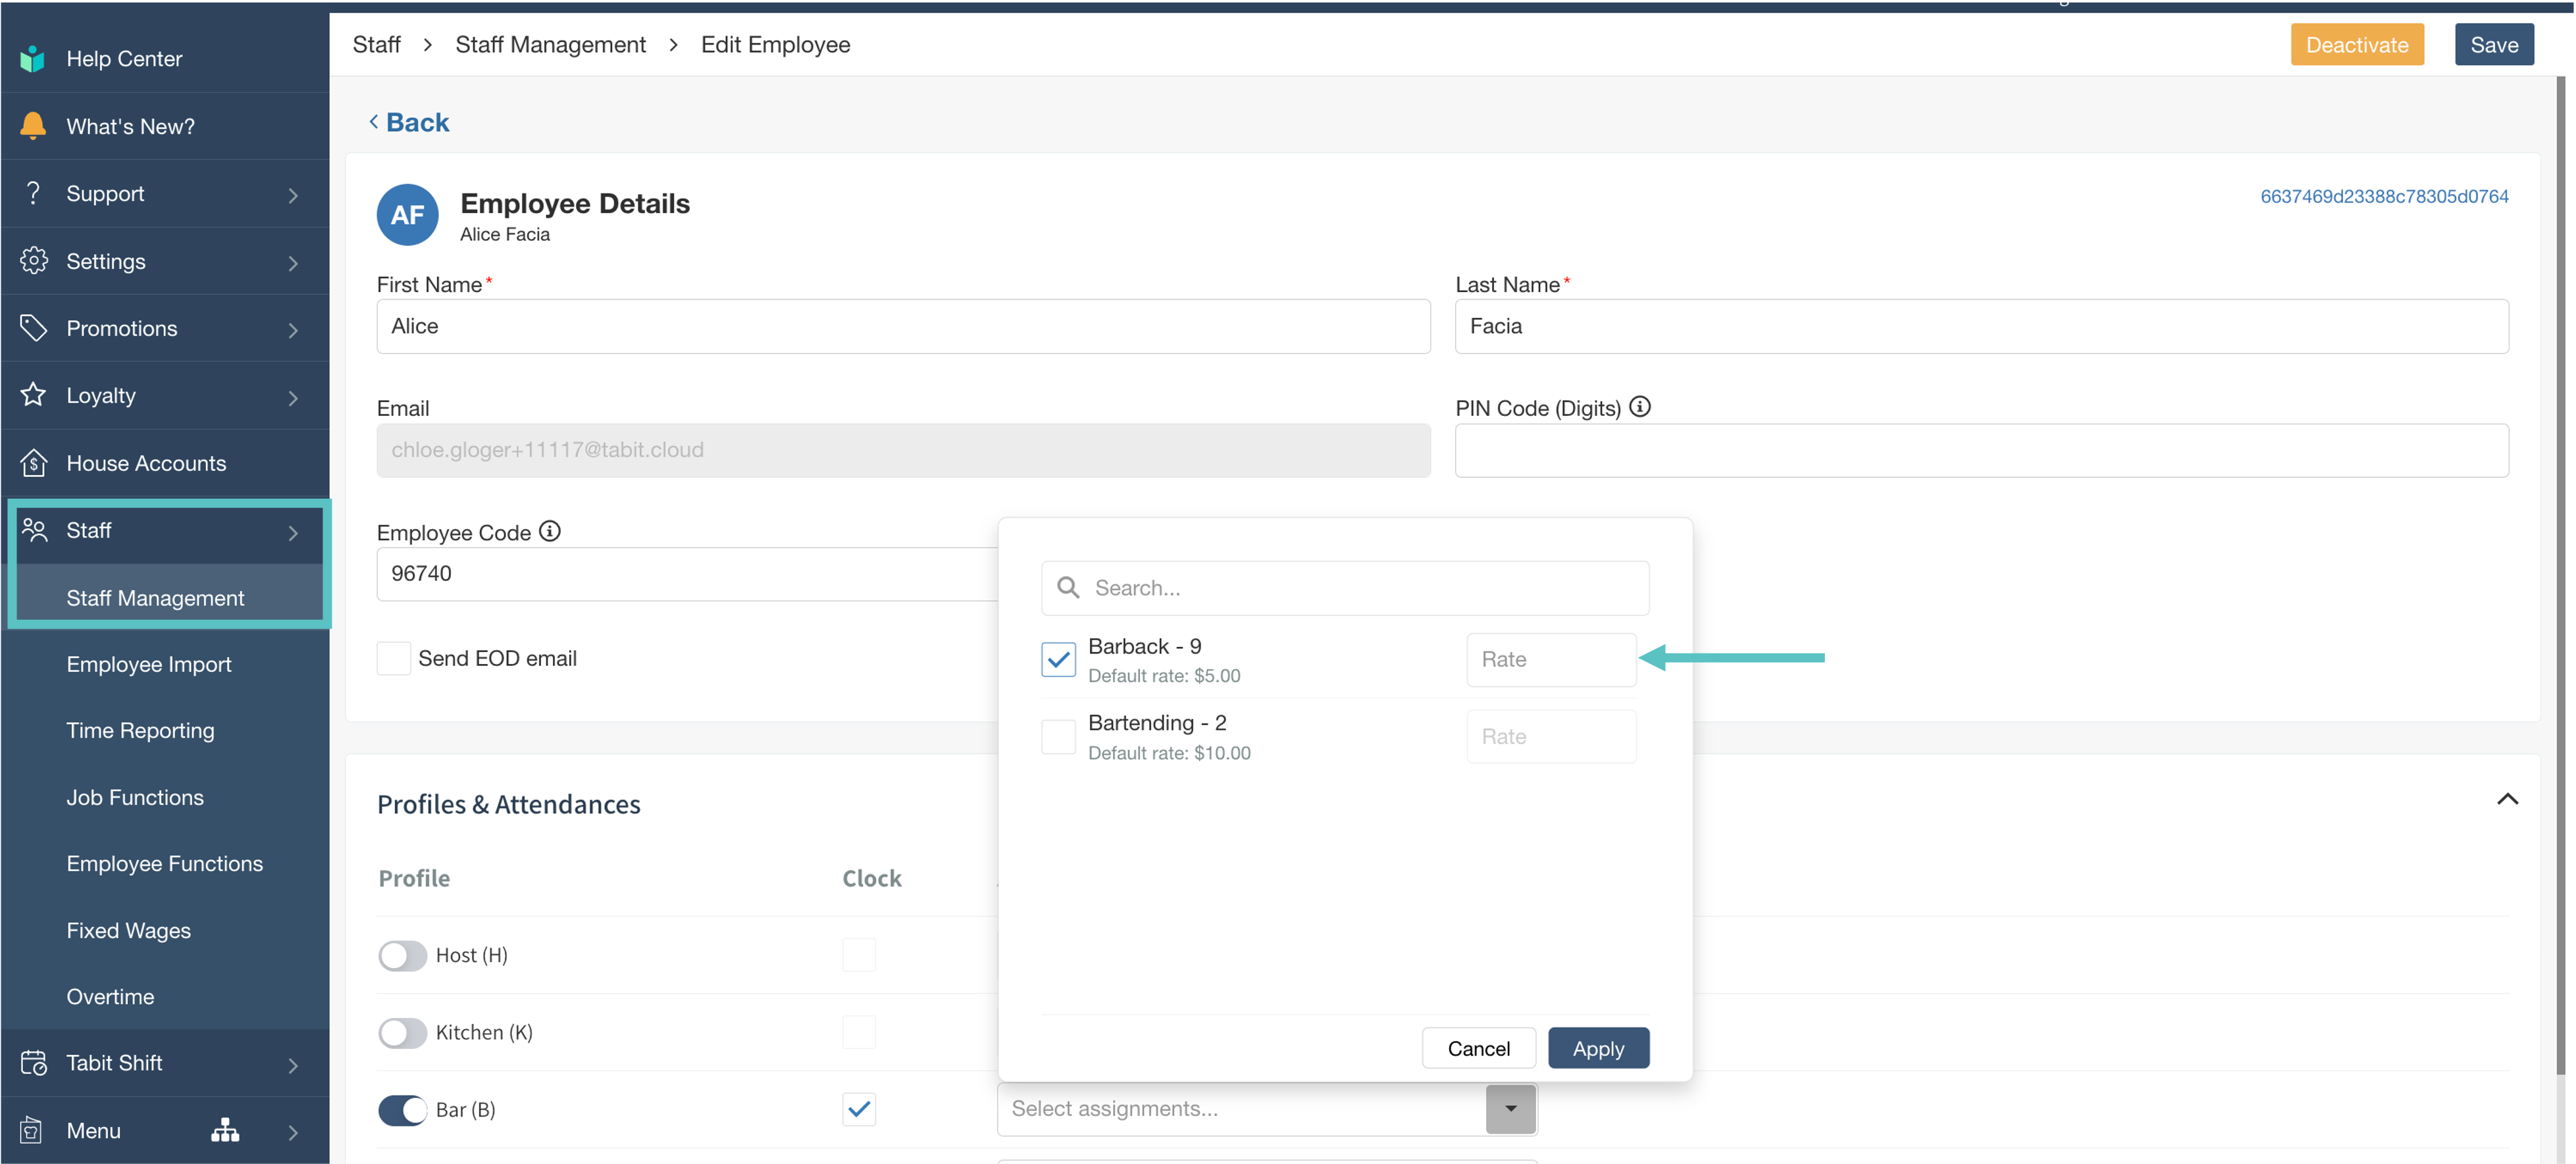
Managers can now assign job functions to employees without leaving the employee profile. A new inline dropdown in the Profiles & Attendances section replaces the need to navigate to a separate assignments page.
Before: Job function assignments were managed on a separate page, requiring managers to leave the employee form, make changes, and navigate back
Now: Job functions can be searched, selected, and saved directly within the add/edit employee form in a single flow
Notes:
-
Users with the appropriate permissions can also view and set custom pay rates per job function from the same dropdown
-
Inactive employees can see their assignments but cannot make changes
Where to find it:
-
In Tabit Office, go to Staff > Staff Management and select any employee
-
In the Profiles & Attendances section, toggle on a profile to see the new job function assignment dropdown and change the default rate if desired
Future stock thresholds now available
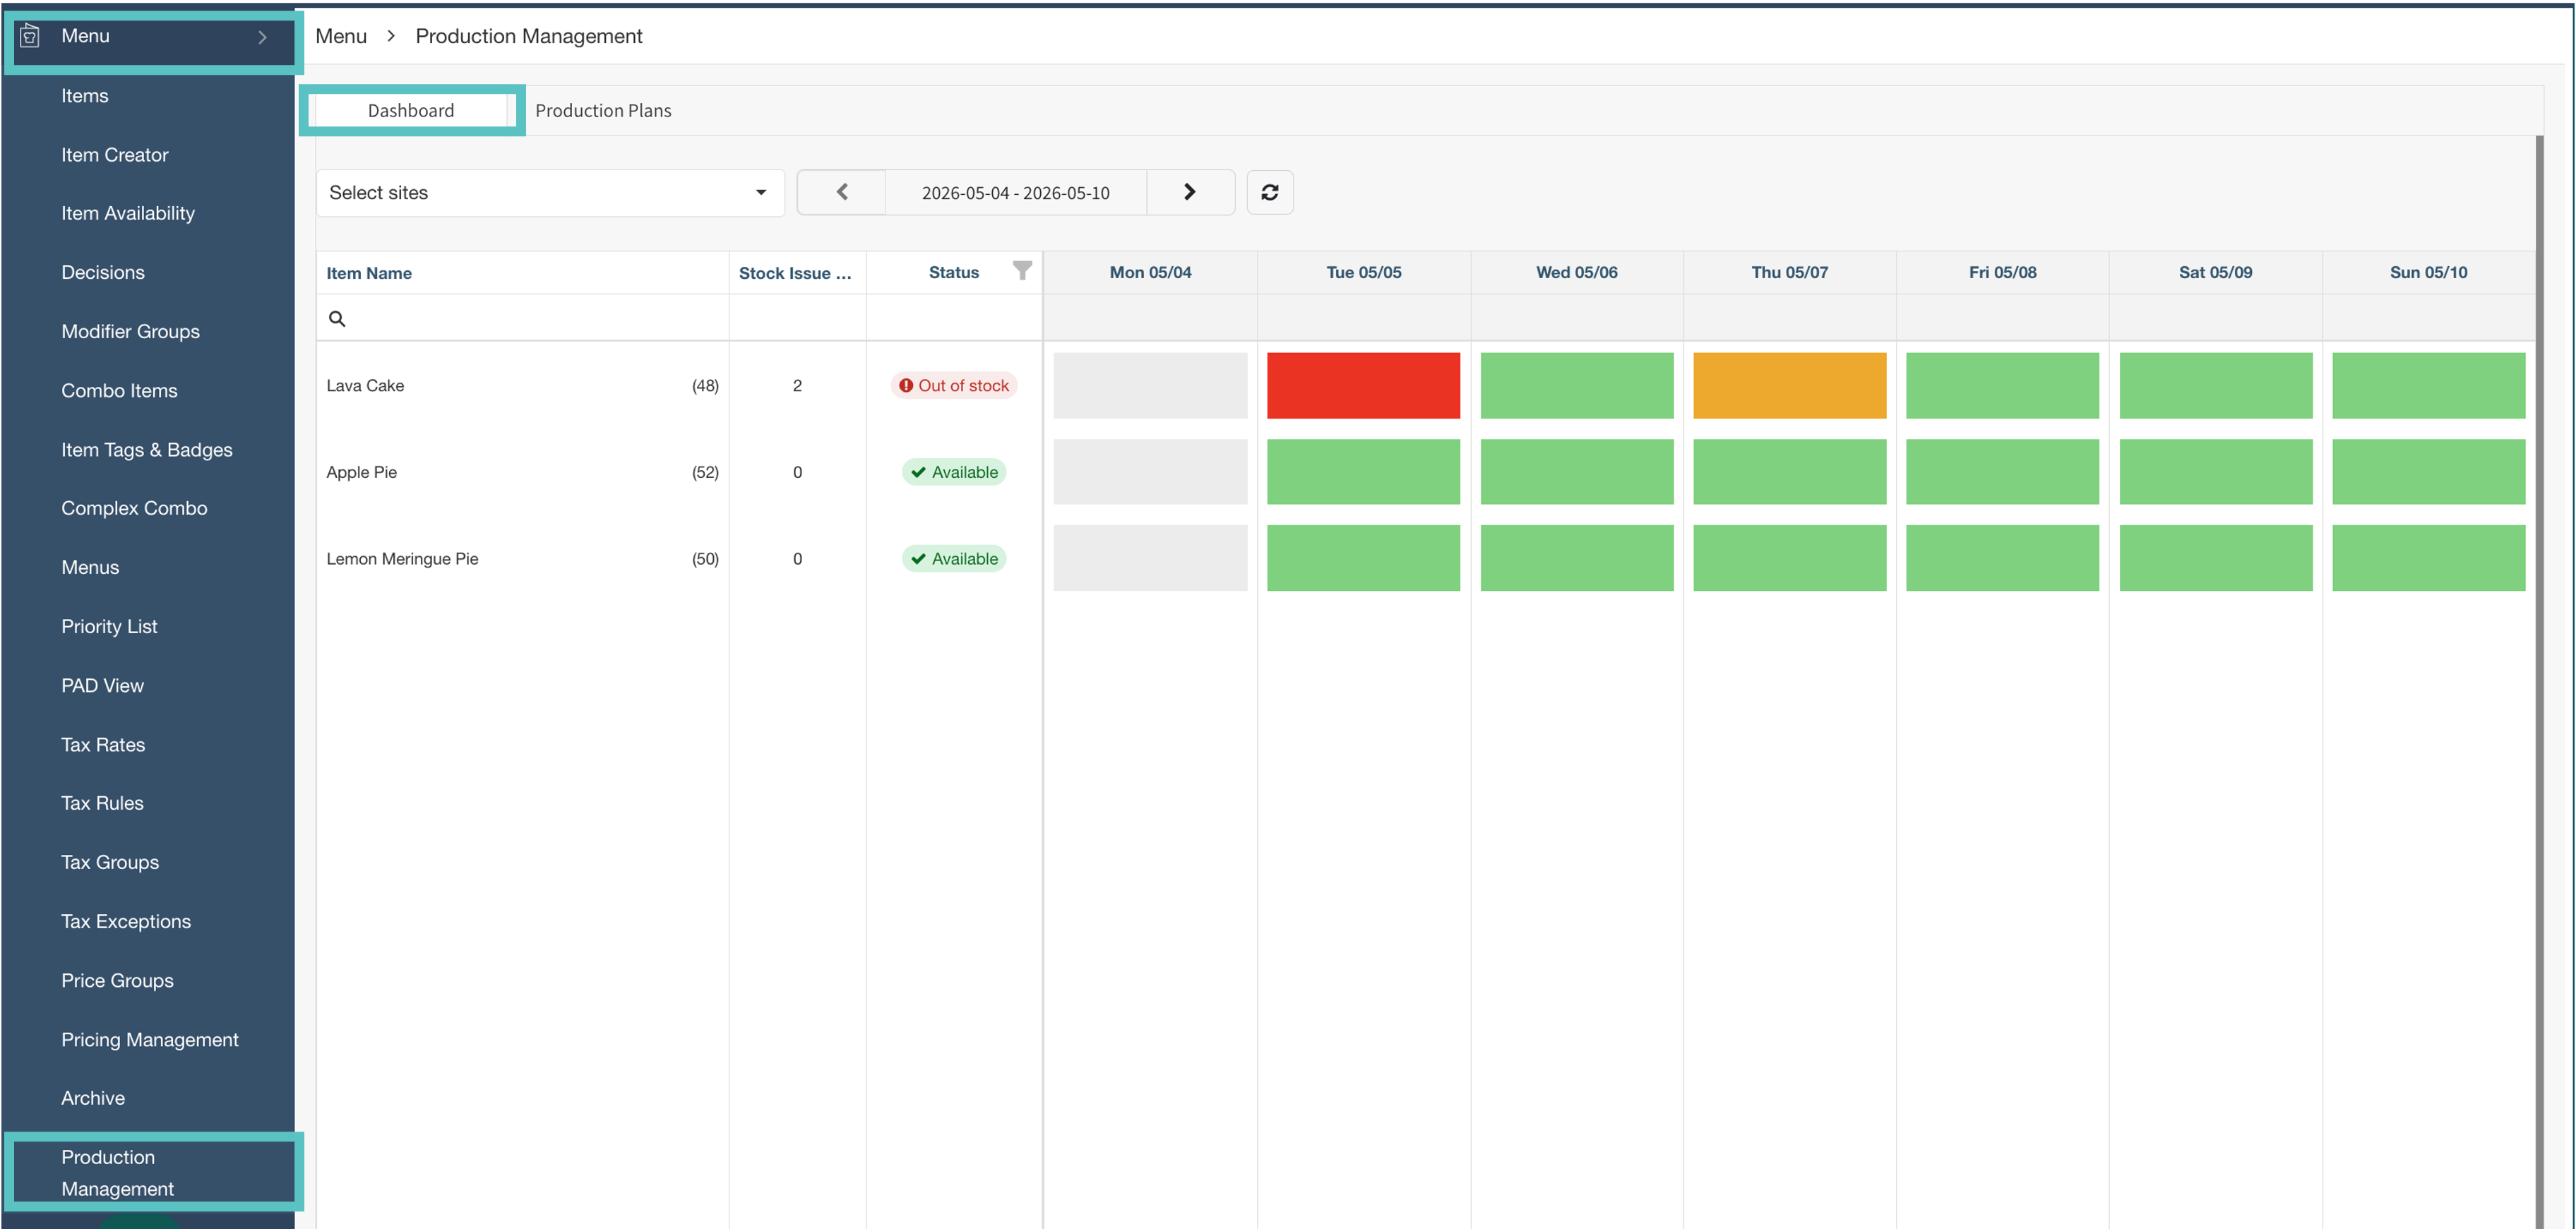
Upcoming inventory can now be monitored across locations from a single dashboard, enhancing production management. Instead of reacting to shortages after they happen, managers can see which items are trending toward low stock or out-of-stock status for the week ahead and act before service is impacted.
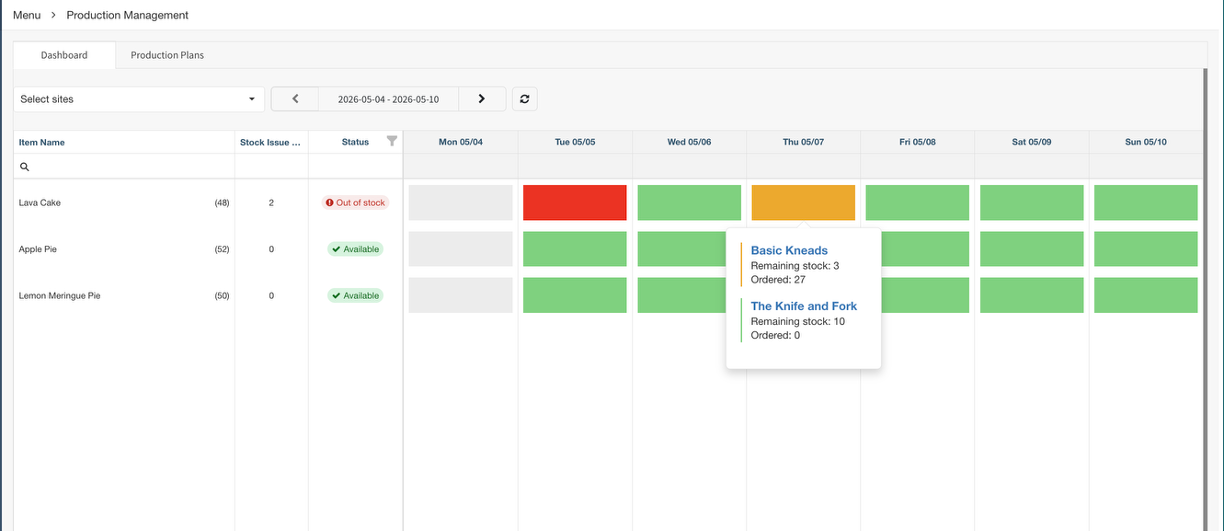
The dashboard shows a weekly view per item, with color-coded day squares indicating each item's projected status: green (available), yellow (below threshold), and red (out of stock). Hovering over any day shows which sites are affected, ranked by lowest remaining stock first.
Notes:
-
The dashboard is only available once inventory data has been configured. New users will land on the Production Data tab first to get set up
-
HQ users can view and edit inventory plans per site and filter by location
-
Access requires the appropriate Future Production Planning permission to be enabled
Where to find it:
-
In Tabit Office, go to Menu > Production Management
-
The new Dashboard shows the status of stock levels for items managed in Production Management
-
Green: Sufficient stock
-
Yellow: 20% stock remaining
-
Red: Out of stock
-
-
Hovering over the cell shows the status at each site as well
Print Documents now automatically added when a site is created
Setting up a new site just got faster. Admins can now mark print templates as defaults, so they're automatically applied whenever a new site is created, no more manual setup or risk of missing configurations during onboarding.
Before: Print templates had to be manually assigned to each new site during onboarding, increasing setup time and the chance of missed configurations
Now: Mark a print template as a default once, and it will be automatically pushed to every new site upon creation
This feature is managed in the Orange Office (OFC) system configurations area and is intended for system admins. It is only relevant for new sites
New system parameter defaults for streamlined site onboarding
New sites now launch with pre-configured defaults that reflect standard operations, reducing manual setup time.
Key defaults being set include:
-
Receipt delivery via SMS text message and email
-
Labor alerts at 32 hours (warning) and 40 hours (critical), on a weekly period
-
Weight units set to pounds (lb)
-
System emails in English
Existing sites are not affected and will retain their current configurations
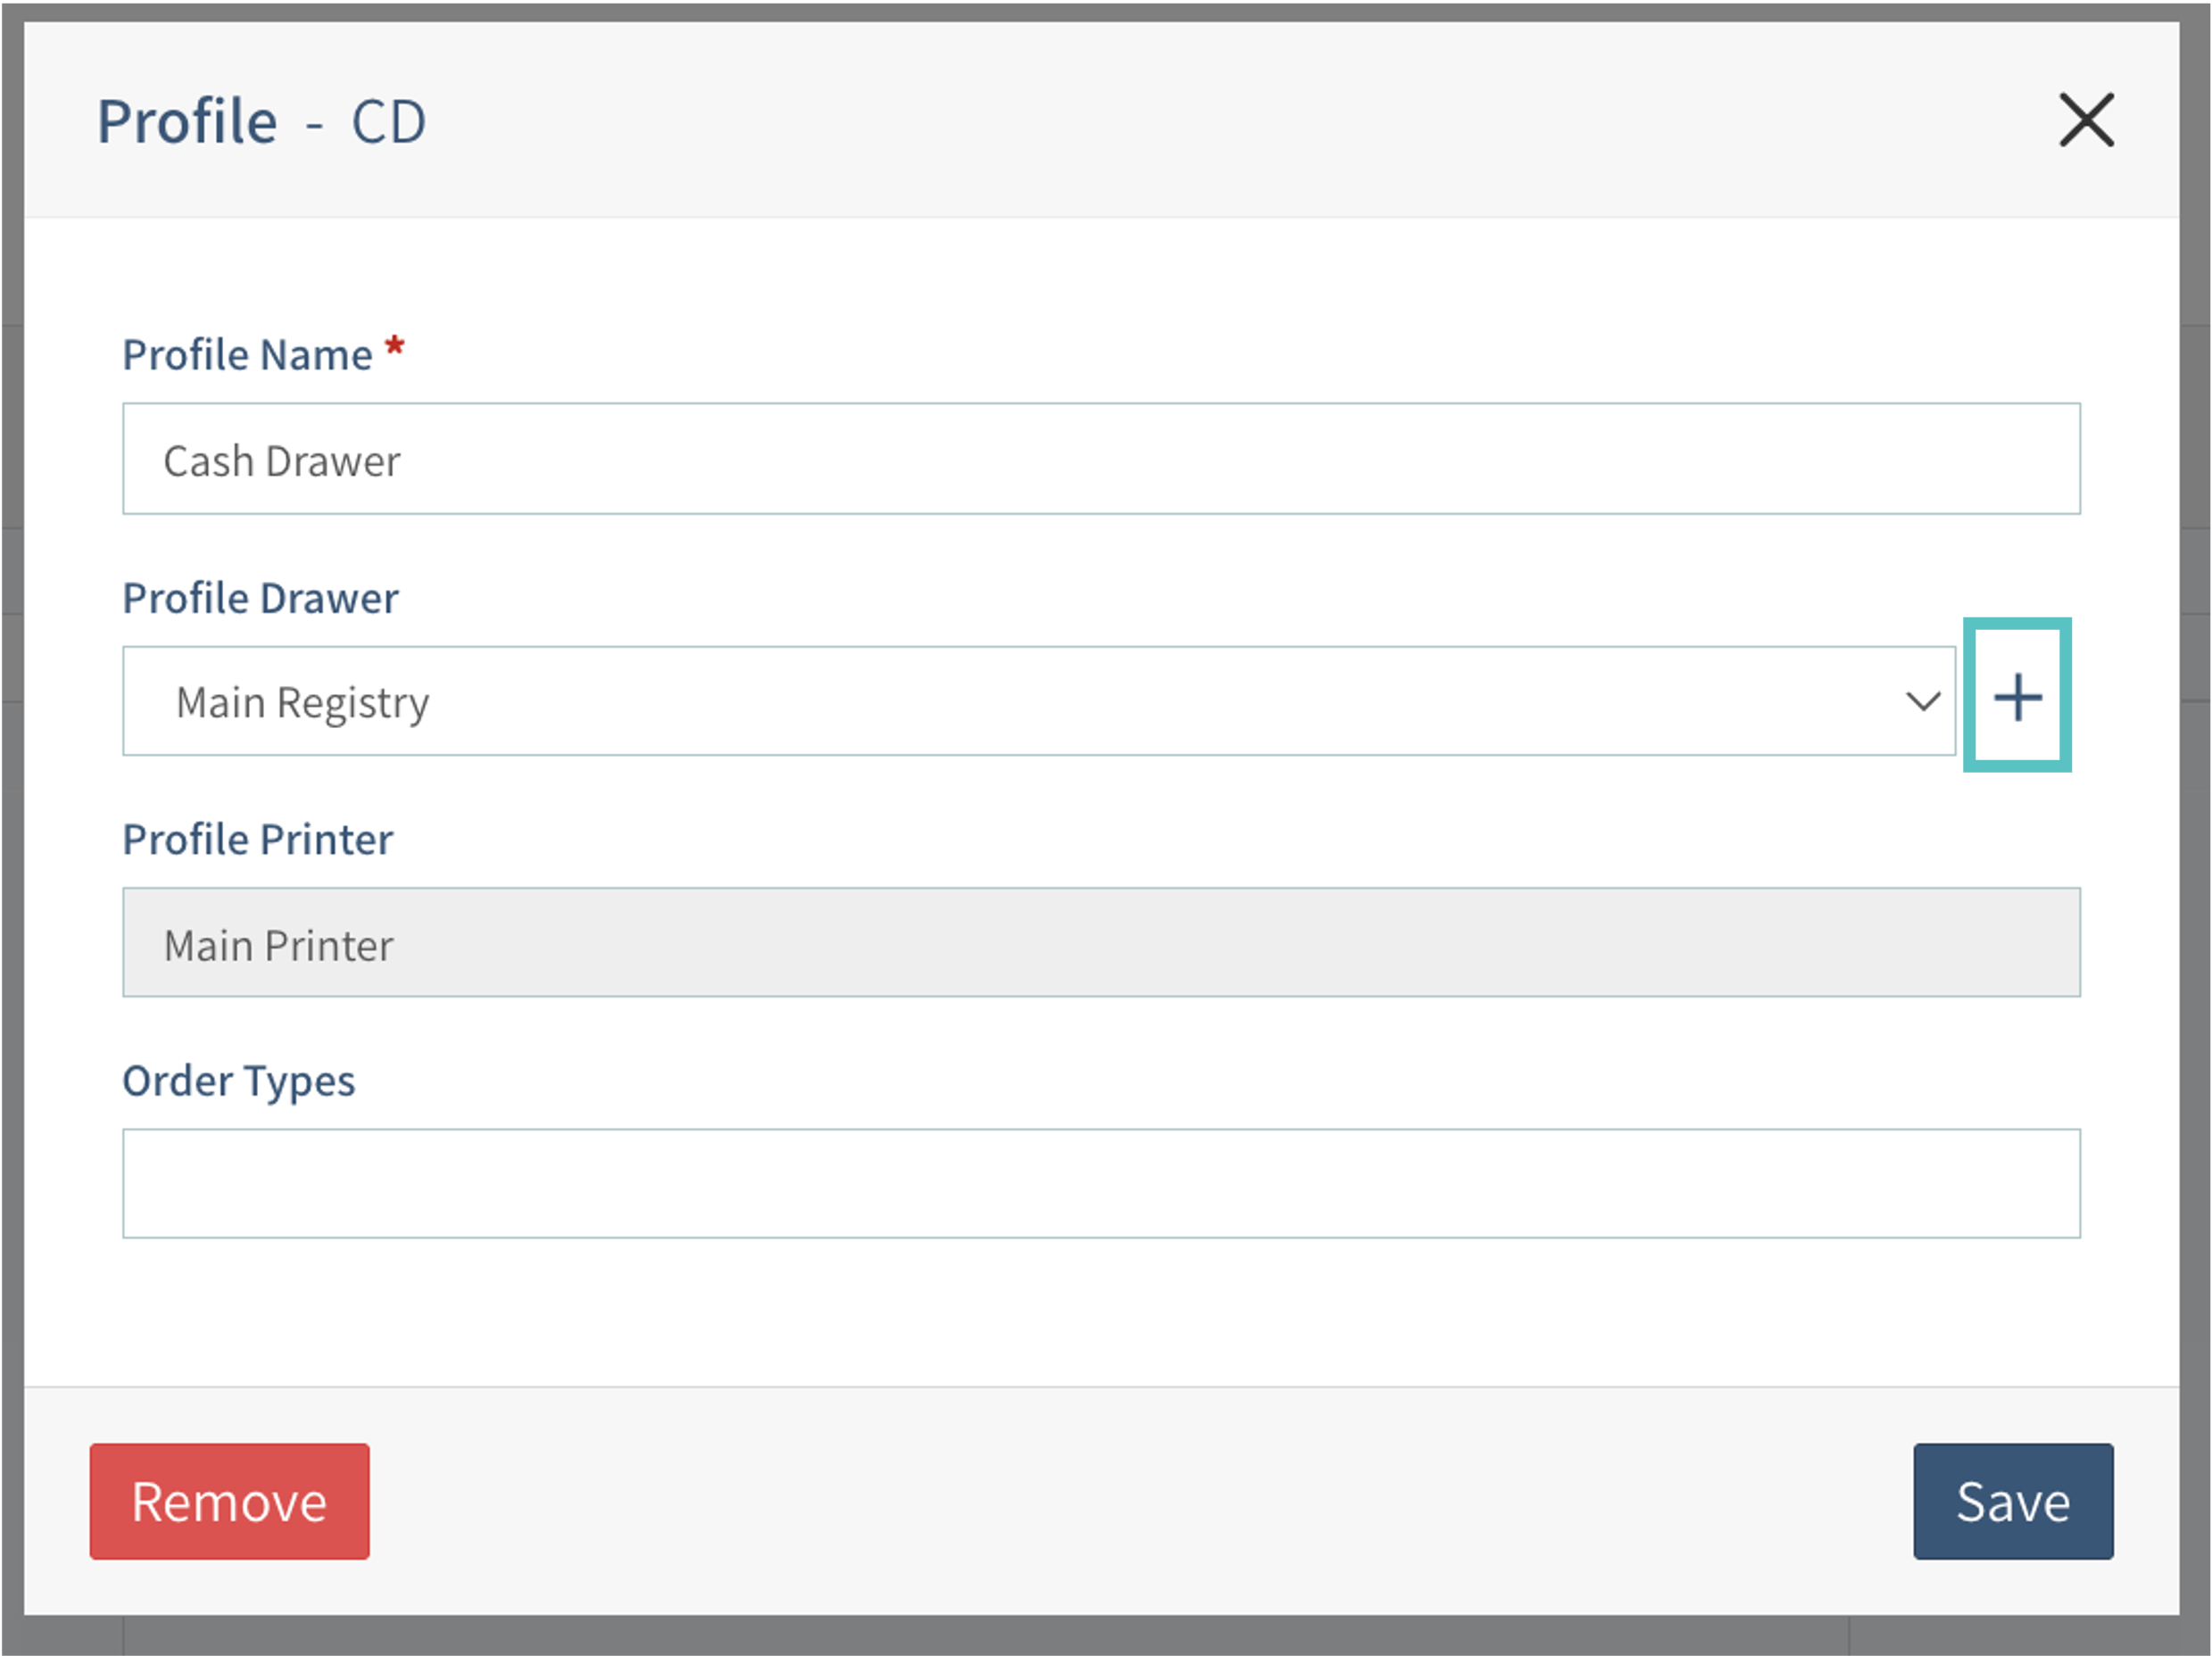
Create printers and cash drawers without leaving the setup modal
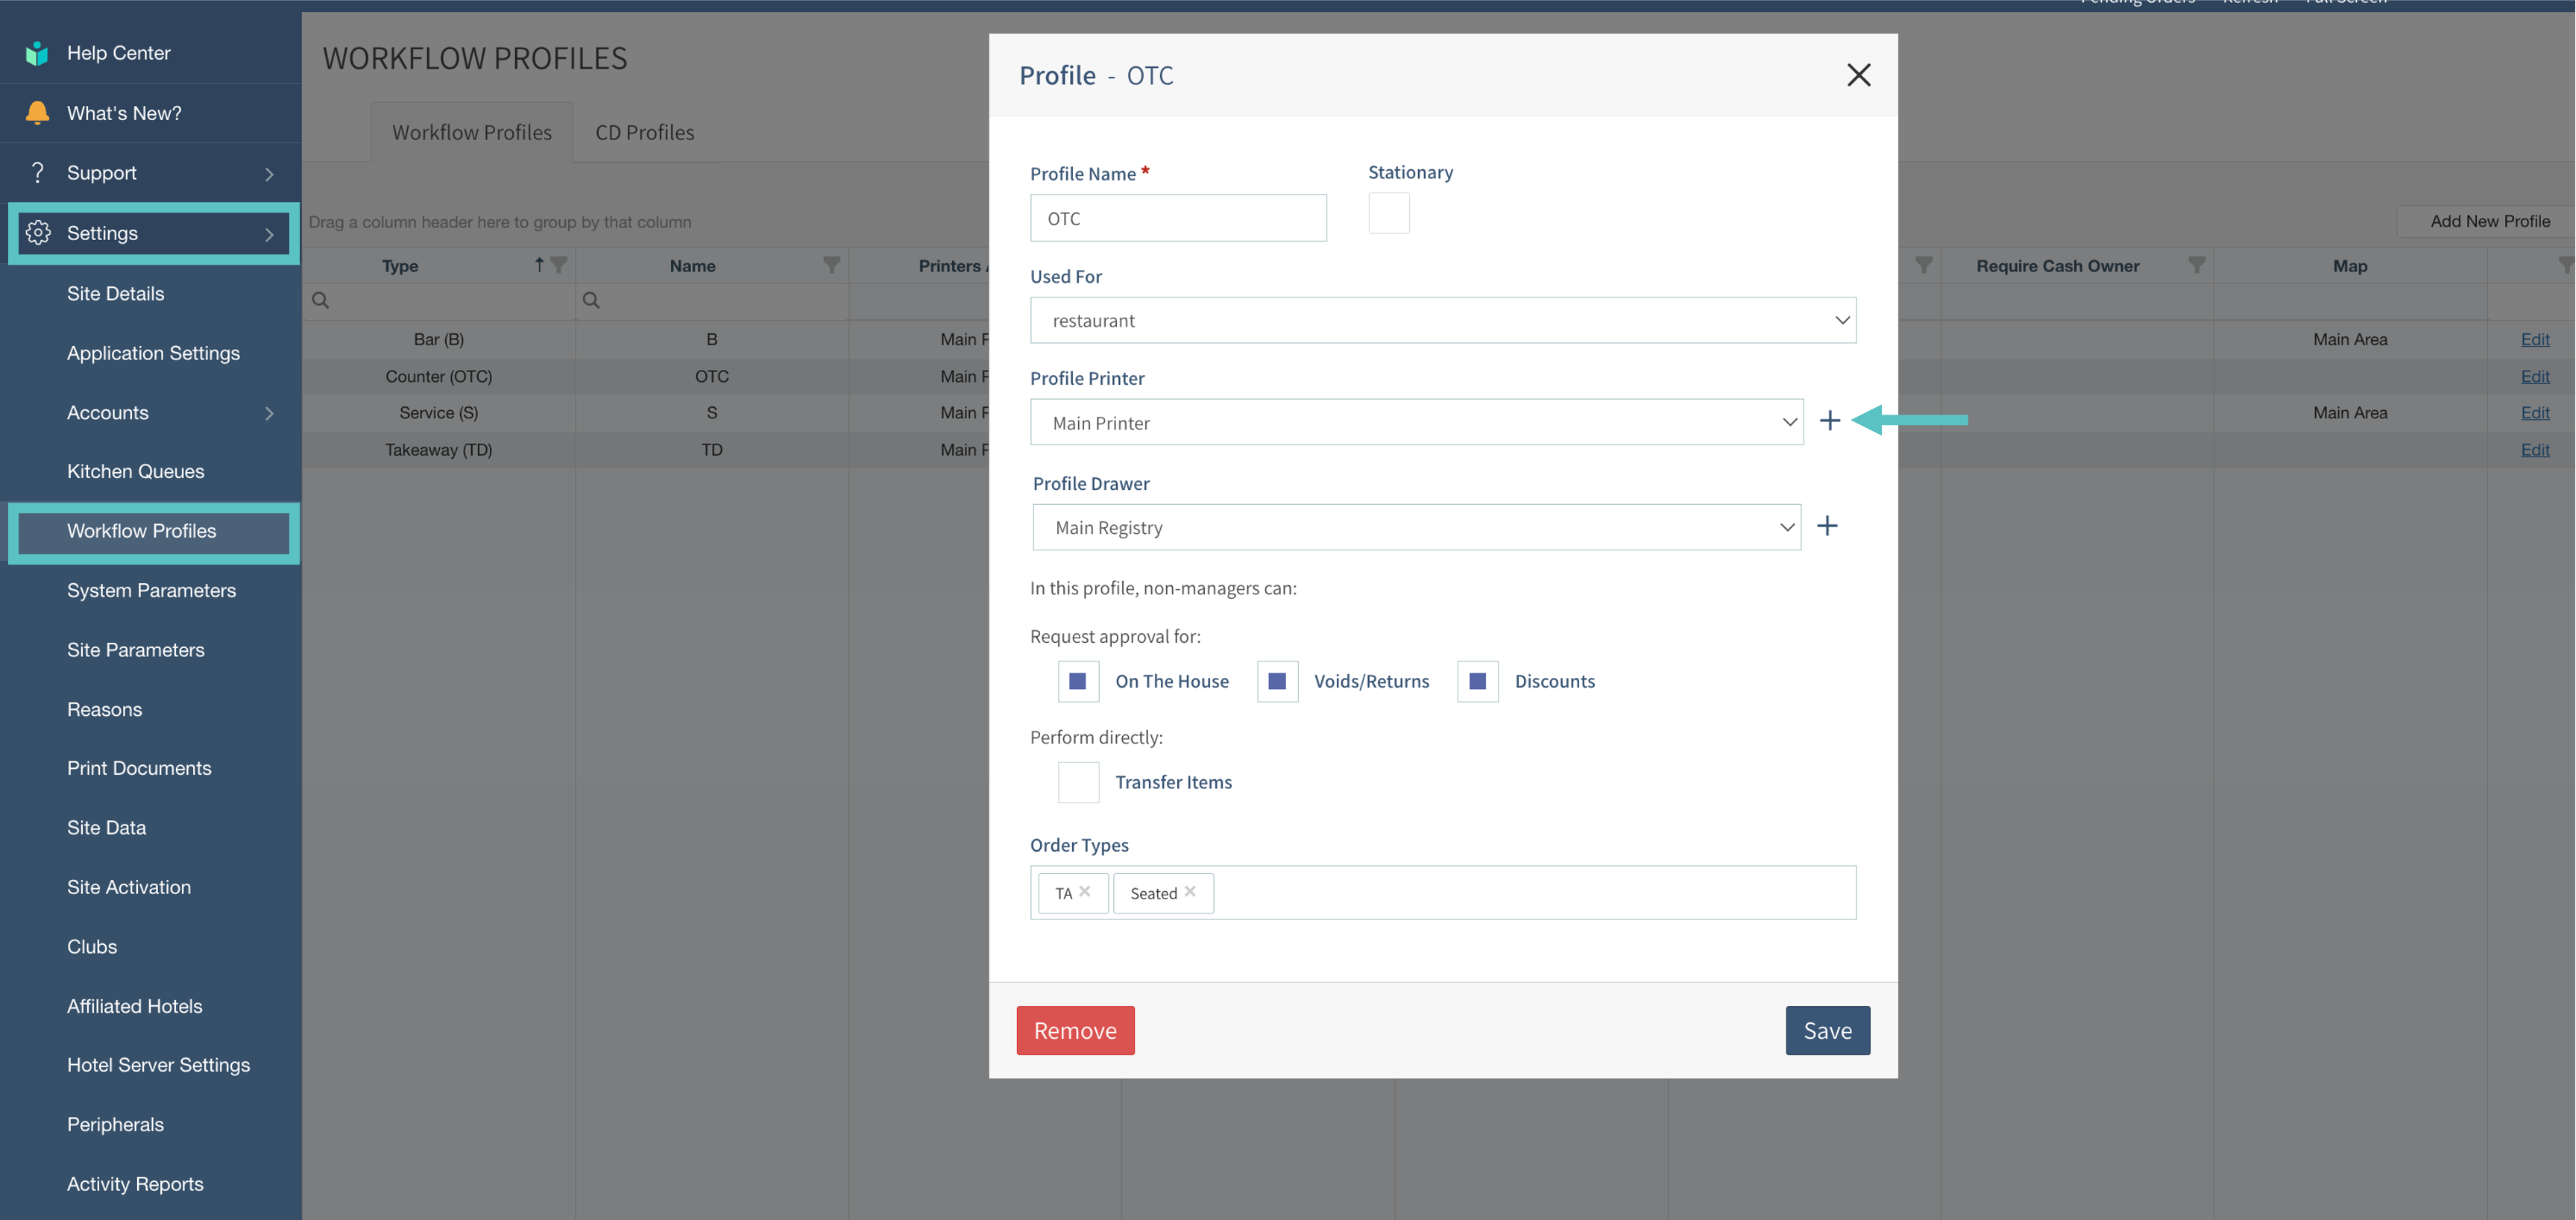
Configuring workflow profiles and kitchen queues just got smoother. Admins can now create a new printer or cash drawer directly from within the setup modal, without navigating away to the Peripherals page and losing their place.
Before: If a needed printer or cash drawer didn't exist yet, admins had to leave the workflow profile or kitchen queue modal, go to Peripherals to create the device, then return and start over
Now: A new + button next to the printer and cash drawer fields lets admins create a device on the spot. The new device is named, saved, and auto-assigned to the profile in one step
This creates the device with a name only.
IP address and full hardware mapping must still be completed on the Peripherals page
Where to find it:
-
In Tabit Office, go to Settings > Workflow Profiles and open any profile to create or edit it, look for the + next to the printer or drawer field
-
For Kitchen Queues, the + next to the printer field is available while in edit mode
Fixes
Cardholder name now shows on pre-auth screens for Magtek transactions
Time reporting now loads as expected for overlapping/extreme attendance records
Scrolling restored on Create Site screen
Switching HQs in HQ Third Party View now behaves as expected
Tabit Order

Improvement
Improved search functionality in Tabit Order
Customers can now find menu items more easily, search results in Tabit Order are no longer limited to item names only.
Before: Searching in Tabit Order only matched against item names. If a customer searched for a general term or concept, they'd get no results even if relevant items existed on the menu
Now: Search now also matches against category names and item descriptions, so customers can find what they're looking for even when they don't know the exact item name
This reduces friction at the point of ordering, helping customers discover items faster and reducing drop-off from failed searches.

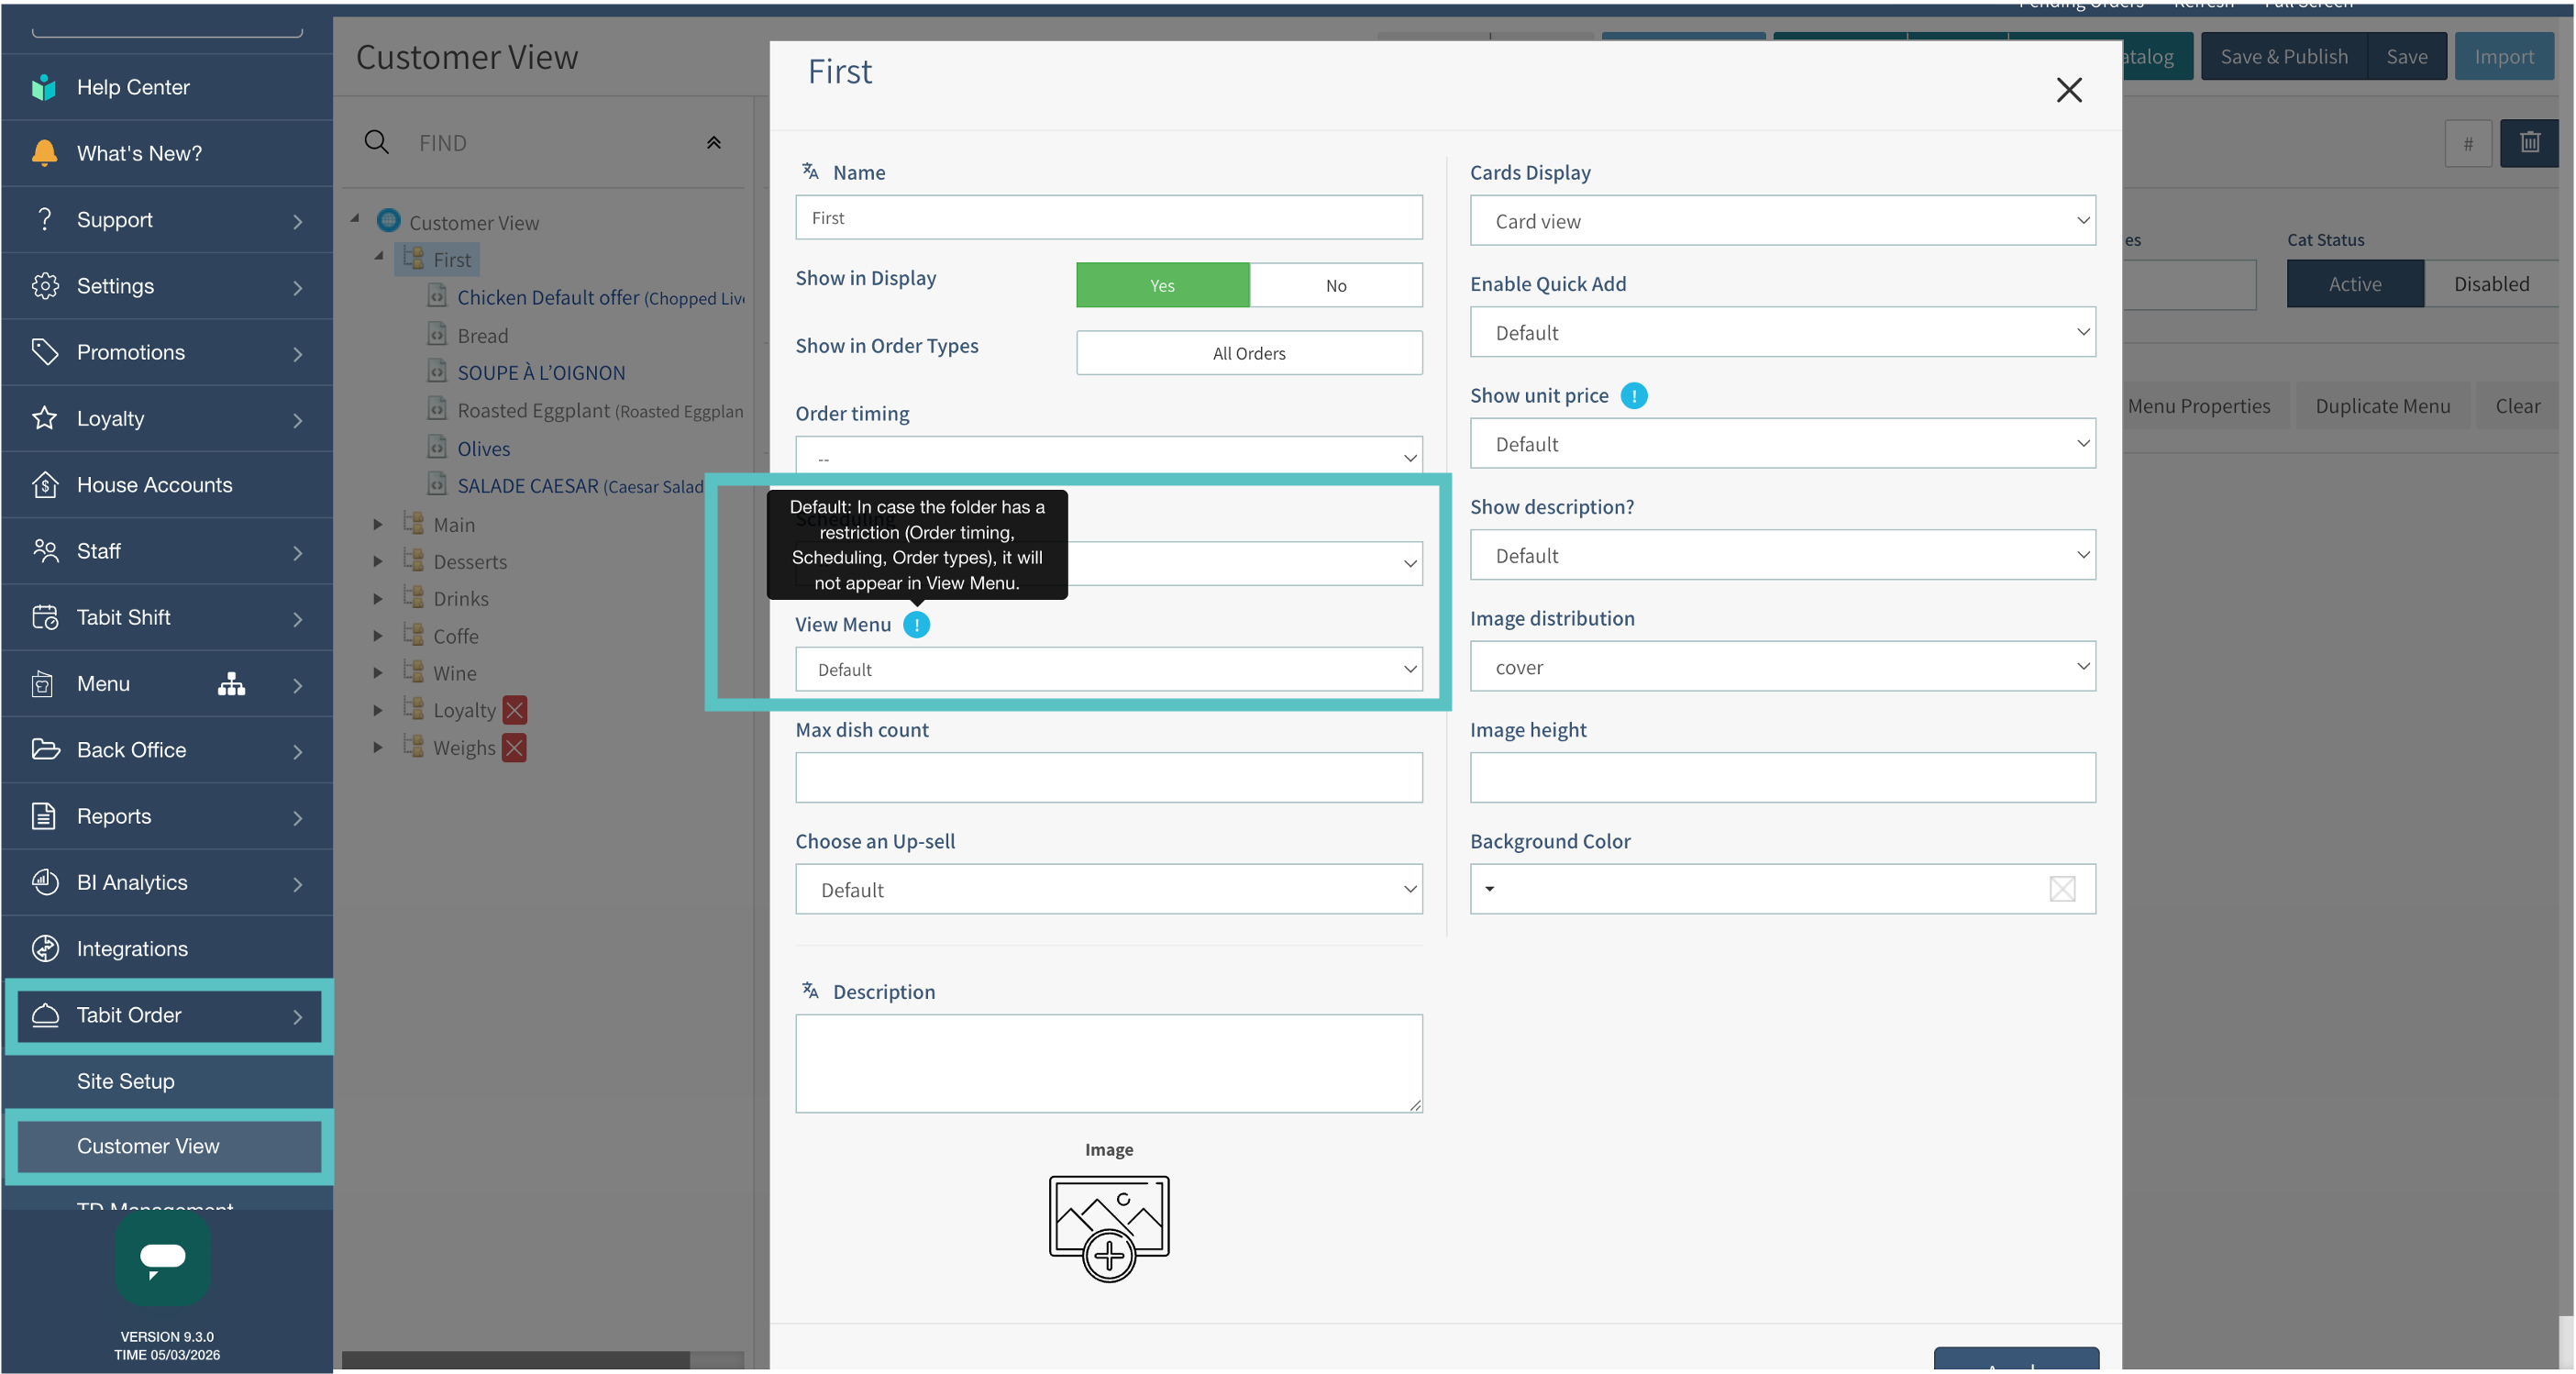
Control visibility and show availability details for View Menu
Two updates have been made to View Menu mode in Tabit Order, giving operators more control over which categories appear, and giving customers clearer context about when those categories are available.
Manual control over category visibility
Previously, any category with a restriction (time slot, order type, or future order) was automatically hidden in View Menu mode with no way to override it. Now, each category has a new View Menu setting with three options:
-
Default: existing behavior; categories with restrictions are hidden automatically
-
Always Show: category always appears in View Menu, regardless of restrictions
-
Never Show: category is always hidden from View Menu
Availability indicators for restricted categories
When a category is set to Always Show, customers will now see exactly when and how that category is available, directly beneath the category name. Indicators are shown in this order:
-
Order timing: ex: Future Order
-
Order type: ex: Delivery, Takeout, Eat In
-
Time slot: days, hours, and/or date range
Items within a View Menu category are display-only, they cannot be tapped or added to an order from this view. Each category's restrictions apply independently; a parent category's settings do not cascade to nested subcategories
Where to find it:
-
In Tabit Office, go to Tabit Order > Customer View > [Category] > Menu Properties > View Menu
-
Here you can set how each menu should behave
-
The menu will now appear as shown below
On Mobile: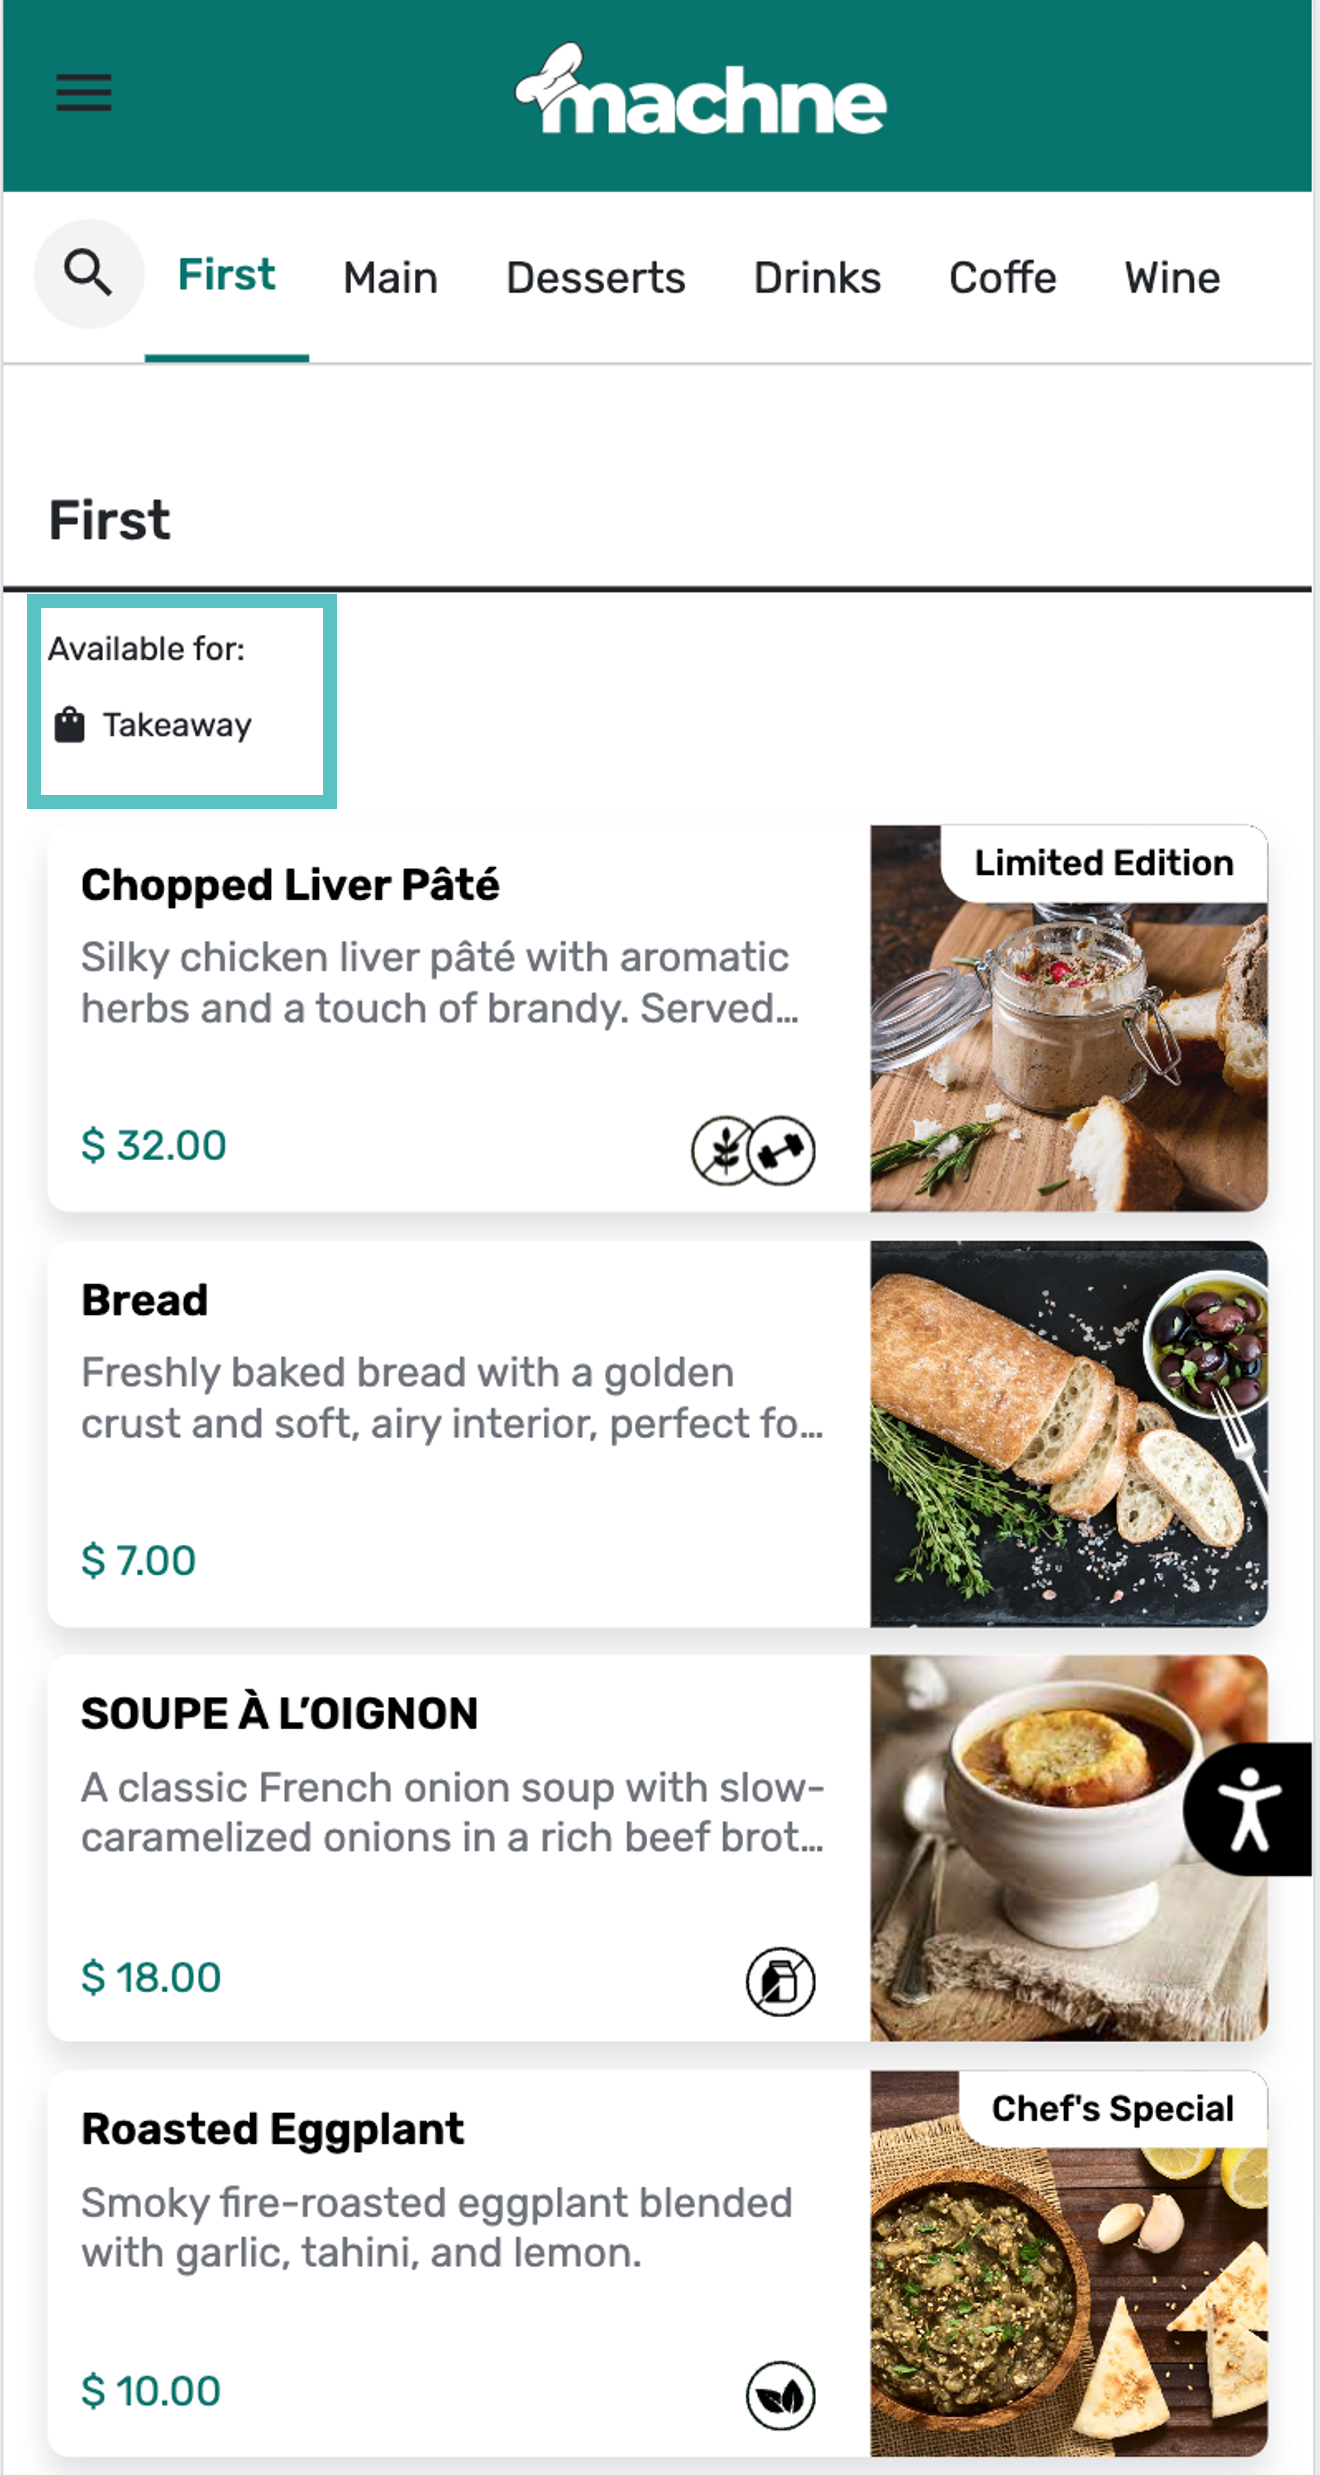
On Desktop:
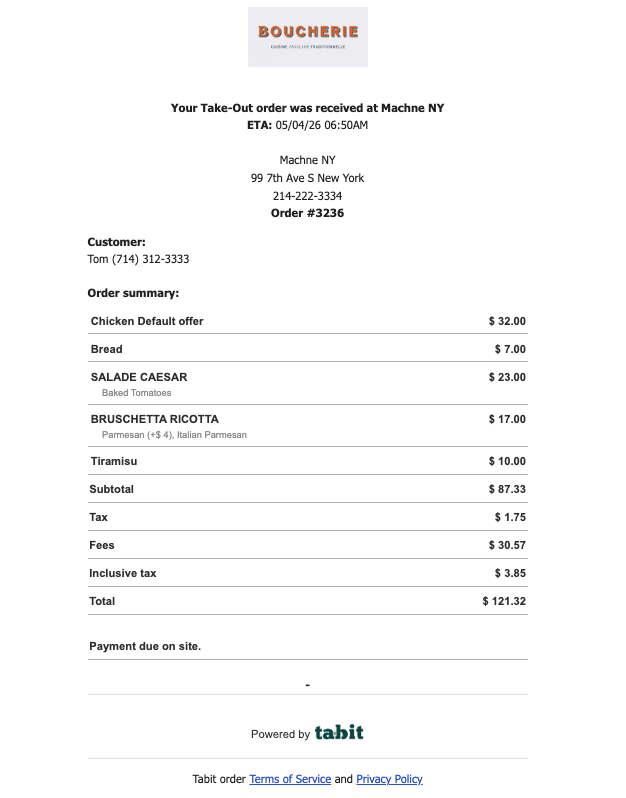
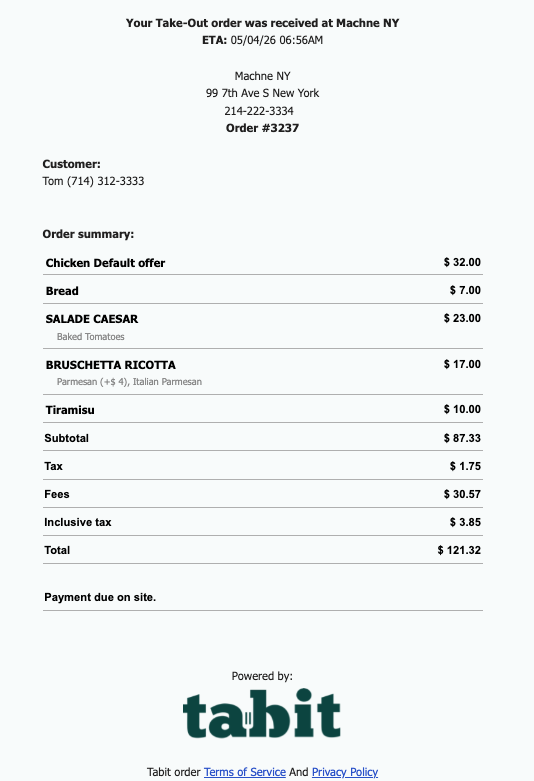
Various improvements to the Tabit Order confirmation email
The order confirmation email sent to customers via Tabit Order has been refreshed with several visual improvements.
-
Restaurant logo: If a logo is on file in the system, it will now appear at the top of the confirmation email, giving the email a more branded, professional look.
-
Centered, compact order table: The order summary table is now reduced in size and centered, for a cleaner layout.
-
Updated footer: The "Powered by Tabit" footer has been visually refined, with a smaller Tabit logo and improved alignment between the logo and text.
No configuration is needed. The logo will appear automatically if one is already saved in the system. If no logo is on file, the email layout will remain unchanged
Now:
Before:
Enhancement
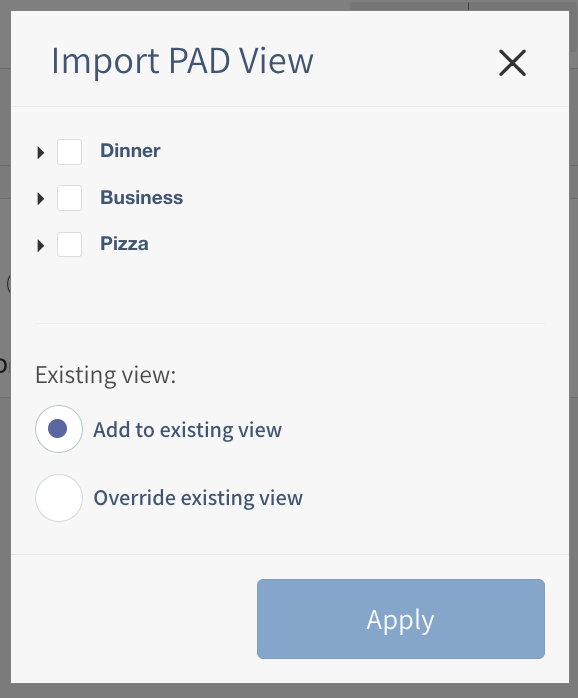
Quick-publish PAD menus to ordering clients
PAD View menus can now be published directly to Tabit Order and Kiosk from a single action, without needing to rebuild or reconfigure the menu separately for each client.
Users can select which PAD menus to push to each client, avoiding the need to import everything and remove unwanted menus afterward. If a Customer View already exists, the user will be prompted to add to the existing view or override it.
The published menu includes the full structure: categories, items, modifiers, and pricing. Each client's version remains independently editable after publishing
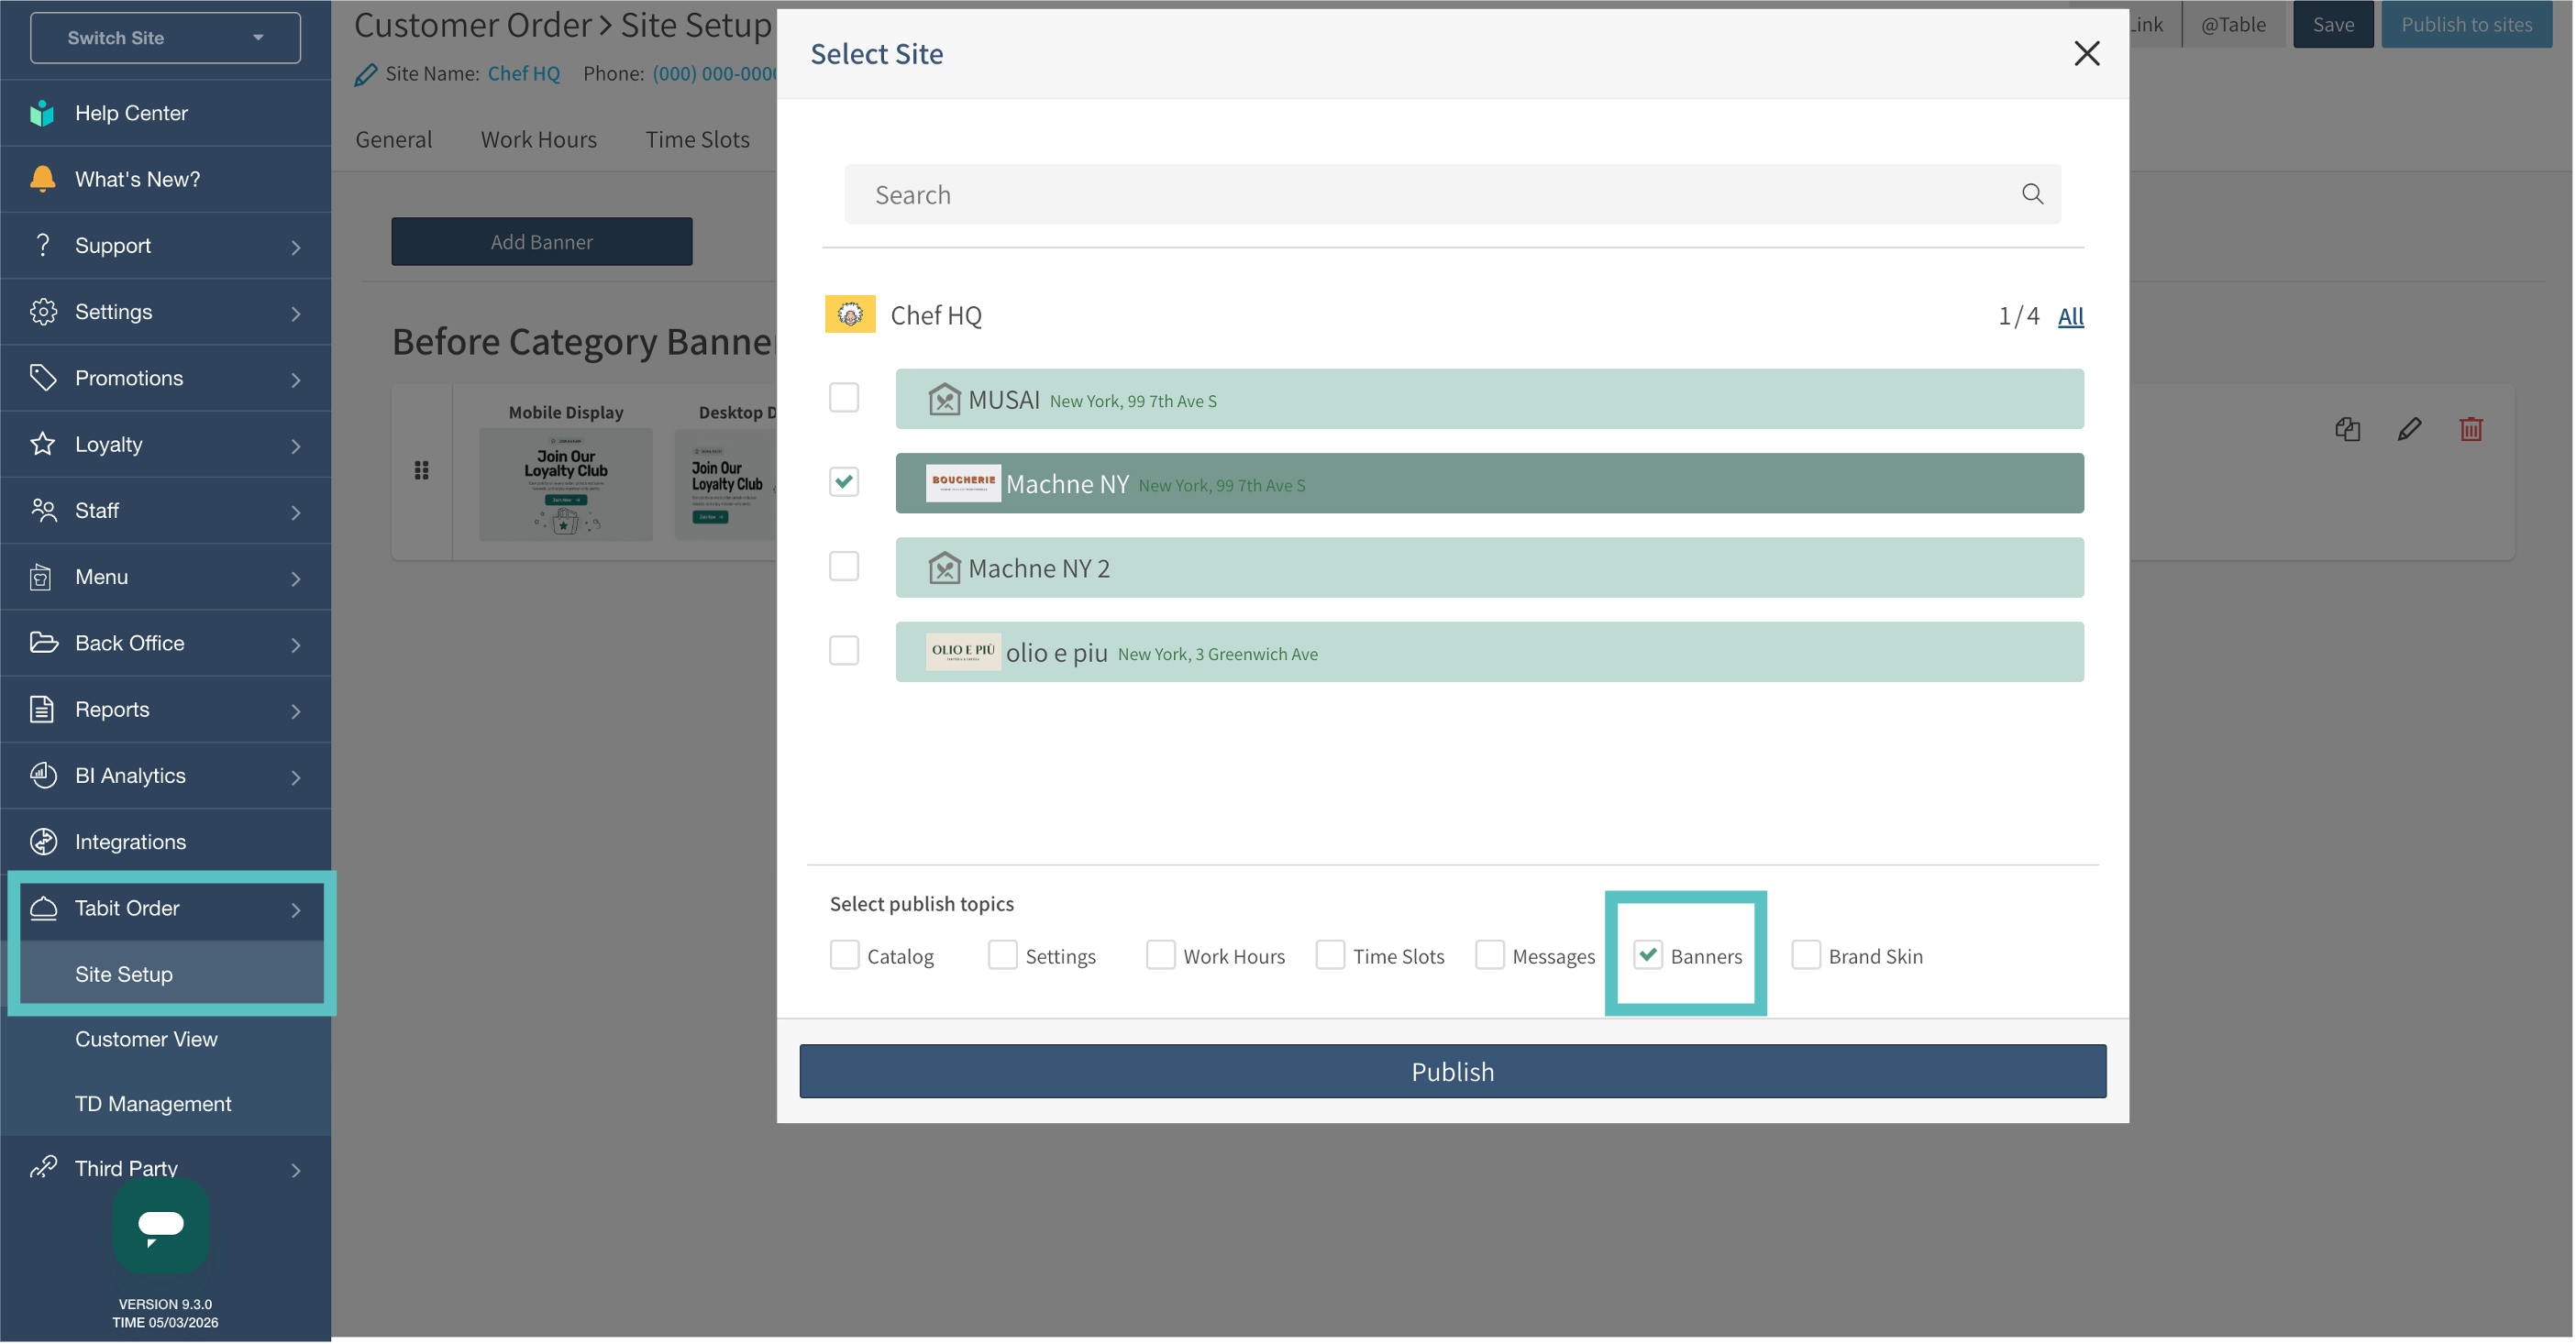
Enhancements to Tabit Order Banners
Various improvements have been made to how Banners function in Tabit Order:
Carousel for multiple banners
Previously, if multiple banners were configured before the same menu category, only one would display. Now, they automatically appear as a scrollable image carousel in that position, giving restaurants more visual real estate to promote items, deals, or content without sacrificing layout.
Reliable banner inheritance for multi-site (HQ/local) setups
When banners are published from an HQ site to child sites, they now go through validation before being displayed. If a banner references a category, item, or time slot that doesn't exist in the child site, it will be suppressed in that site's Tabit Order, rather than showing a broken or misconfigured banner to customers.
This affects multi-site groups using HQ-to-child banner publishing. Banners that appear correctly in the HQ site may not appear in child sites if the referenced content (category, item, or time slot) hasn't been configured there. Review child site banners after publishing to confirm expected display
Where to find it:
From the HQ level, in Tabit Office go to Tabit Order > Site Setup. Select Publish to sites and the option to publish Banners is now available